PC 4112 Half-Blind Dovetail Jig


Page Directory

Introduction

What I Like

What I Don't Like

The Bottom Line

Assembly

Setup

Making a Drawer

Tips

Guide Bushings

Stabilizer Table

Site Directory

Home

Tool Reviews

Projects & Plans

Articles

Our Shop

FAQs

Sites I Like to Visit

Build a Kayak


E-Mail Us!


Printer Friendly
Version of
this article

Template Guide Bushings


Guide bushings (also known as collars or a guide bush) are extremely versatile and indispensible for many router operations. However, I have learned the hard way that guide bushings can be a source of fit problems when used with dovetail jigs, especially combination jigs like the Leigh and the AKEDA.

I have found two common problems with guide bushings:

  • They are often poorly machined. Their diameter and out-of-center tolerances vary greatly. I have guide bushings that are .030" out-of-center!. The best bet is to purchase precision guide bushings from Leigh, AKEDA (through Woodcraft), or whomever. Leigh offers precision 7/16" and 5/8" OD bushings, AKEDA offers a 7/16" precision bushing. The 7/16" OD bushing is the most widely used bushing with Leigh and AKEDA dovetail jigs. The PC4112/PC7116 use the 5/8" OD bushing. Note that for through and half-blind dovetails, the guide diameter is not super critical on the Leigh, since fit is controlled by moving the pin template out/in (through dovetails) or by raising/lowering the bit (half-blind dovetails).

  • Even if you have precise guide bushings, depending on your router, it may be difficult to center the router bit perfectly within the guide bushing. Perfeclty centering the router bit to a guide bushing is easier said than done. For instance, Porter-Cable routers mount their base to the router using flat head screws. As you tighten the screws, they center themselves in the base, drawing the base to "their center". Thus trying to center them is almost impossible. Some Bosch bases (1617 for instance) are mounted with pan-head screws, which do allow for some adjustment. However, you still may not be successful in perfectly centering the base, bushing, and bit (even with their centering cone).

To determine whether your bit is centered in the guide bushing, simply lower the bit into the bushing, rotate the bit, and look to see whether the tips of the bit are centered within the bushing for an entire rotation. Since a dovetail bit is angled, you can lower it into the guide bushing until it barely touches--just make sure to rotate it backwards. Or, better yet, perform the following: Or, better yet, perform the following:

  1. Mount the guide bushing and a straight bit in the router. The straight bit diameter must be less than the OD of the guide bushing.
  2. Setup your DT jig guide fingers to cut tails.
  3. Clamp a test board under the tail guides.
  4. Run the router through several guides.
  5. Visibly inspect the cut to determine that the cut is centered within the tail finger space. If it is centered, you're done.
  6. Otherwise, loosen the guide bush, rotate it 1/4 turn, and tighten it again.
  7. Repeat these steps until you get a satisfactory cut. You might want to mark the face of the guide bushing and router base to simplify this procedure next time around.
  8. If you cannot get the bit to center with the guide bush, try another guide bush. If you still have problems, you can try centering the base of the router/guide bush to the bit, but again, this is easier said than done.
  9. If you cannot correct the off-center problem, you might lessen the problem if you rotate the bushing so that the greatest deviation faces away from the jig (towards the operator). Then, make sure you keep the router facing the same direction as you rout the dovetails.


Dovetail Jig Stabilizer Table


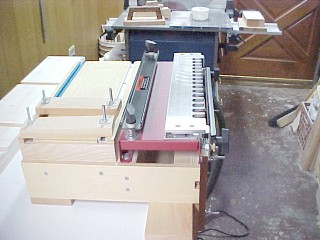
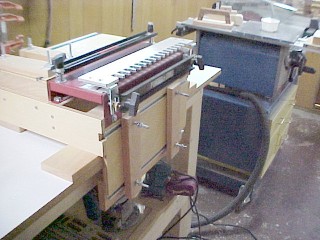
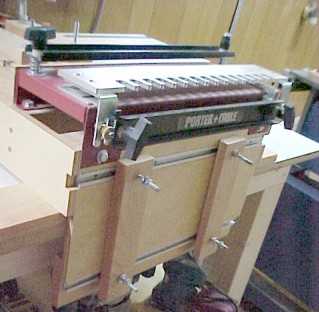
Wood Magazine has published a free project to build a Dovetail Jig Stabilizer Guide. I have not built it but can express the need for such a table. R.L. Mott sent me some photos of his stablizer table/guide. Note that RL added some T-Track to improve on the Wood Magazine design:

RL Mott Wood Mag Stabilizer Table-a
RL Mott Wood Mag Stabilizer Table-b
RL Mott Wood Mag Stabilizer Table-c

If you cannot access the Wood Magazine site, click here to view the article in Acrobat Reader format.


Alternatives and Other Jigs


Don't discount making TD joints by hand or the hybrid method employing both the bandsaw and hand. If you're not doing a ton of TD joints, doing them by hand makes sense. If you're a novice at making TD joints by hand, buy or rent the Dovetail a Drawer video by Frank Klausz. Actually, this video teaches alot more than just dovetails. I found his general woodworking techniques to be very enlightening.

I came up with a chart comparing the Keller, Leigh, AKEDA, and PC Omnijig dovetail jigs. Click here to view it.

Here is a run down of Dovetail jigs you might consider:

  • AKEDA DC-16 Through and Half-Blind Dovetail Jig
    The AKEDA DC-16 from AKEDA Jigs Incorporated is the new guy on the block and certainly is a must-consider dovetail jig. Without any adjustments, the jig produced flawless, variably-spaced through dovetails for a box on my first try. I had the same experience with my first drawer. The jig comes through on its promises: no adjustments, excellent dust collection, virtually no setup, dovetail layout is easy and repeatable. It is quite simply a joy to use. Also, I like the geometry of the dovetails. They're more aesthetically pleasing than most machine-produced dovetails. Woodcraft handles the distribution of the AKEDA DC-16 for the U.S.

  • Leigh D4 Through and Half-Blind Dovetail Jig
    The Leigh dovetail jig Leigh Industries, Ltd. Is considered one of the best jigs on the market. I have had one for many years and like it for through dovetails. Leigh offers an extensive array of accessories that allow you to mill mortise and tenons, a variety of box joints, and decorative joints.

  • Porter Cable 16" and 24" (5116 and 7116) Dovetail Jigs
    The Porter Cable #5115 and #7116 jigs run $350 and $400, respectively. They are among the most robust jigs on the market. Porter Cable offers a variety of optional templates to compete with the Leigh as being the most versatile dovetail jig available. Someday we'll get around to publishing a review on it.

  • Porter Cable 12" 4112 Half-Blind Dovetail Jig
    The Porter Cable #4112 dovetail jig runs about $100 and is for my money, the best HB dovetail jig around. Click here to read my PC 4112 review.

  • Keller Through Dovetail Jig
    The Keller is considered by some as the easiest-to-use through Dovetail jig. I agree! Models run $150-$450. I purchased my Keller 1601 from Seven Corners Hardware for $189.00, which is considerably less than the show price ($209) or the suggested retail price ($249). Check out the Keller web site! It provides some great info and a gallery of work from Keller users!

  • Woodrat Dovetail/Joinery Jig
    The Woodrat is perhaps the most unique dovetail (joinery) jig on the market, and thus appears to have the largest learning curve. I have not used the jig, but it gets high points for versatility and creative/artistic capacity. Setups appear to be more complex than typical jigs. Runs in the neighborhood of $500.

  • RBI Wood Tools
    RBI sells a PC 4112 look-alike for $100.

  • Hartville Tools Model 12378
    The 12378 is another PC 4112 look-alike for $100. Hartville sells aftermarket cam-action clamps for the 12378 that also fit the PC 4112.

  • Woodhaven Dovetail Jigs
    Woodhaven sells a variety of dovetail jigs including their new top-of-the-line jig that can be used in the conventional mode or on top of a router table.

  • Sears Craftsman Dovetail Jigs
    Don't laugh, my father uses one of the cheaper models with excellent results. I recently gave him my old Woodstock Intl jig so he might retire the Craftsman, but don't count on it.

  • Woodstock Intl Half-Blind Dovetail Jig W1099
    This jig, also sold by Harbor Freight (Central Machine) and others, runs between $40 and $60. It works pretty well.

  • Katie Jig
    A relatively new jig that has received good reviews. It runs $250 plus. Marc Sommerfeld demos the Katie at the Woodworking shows. Impressive in that you can clamp a tail and pin board in the jig at one time (given you're cutting them on a router table). This ensures the alignment of the top/bottom edges and could be a real time saver if you had a two router setup like Marc Sommerfeld has at the shows. One drawback I saw in the demo is that the tails/pins top/bottom orientation is swapped on each end, unless you had two setups. If you get a chance to attend the WW Shows, look at the side of Marc Sommerfeld's drawers and you'll see what I mean. Functionally sound, but......

  • Stots Dovetail Template Master
    You use this template master to make dovetail and box joint jig templates. You can use it to make templates of virtually any size. It runs about $50 plus another $30 for the router bits if you don't have them. I want to try this tool, but I just have not had the time to fool around with it. Review coming soon.

  • Incra and Jointech Router Fence Incremental/Positional Jigs
    I would not consider the Incra and Jointech jigs for production work, but they work well if you are up to the setup. They work as advertised, but are time consuming to setup and use compared with dedicated dovetail jigs. For what it's worth, I prefer the Jointech positioner over the Incra. The Jointech is more roubust, uses leadscrew technology instead of the incremental racks, templates are easier to use, provides built-in centering, and their fence construction and design is excellent.

  • The $19.99 Half-Blind Dovetail Jig
    The Popular Woodworking September 1999 issue ran an article on a $19.99 half-blind dovetail jig. Click here to view the article in PDF Format. The author (Troy Sexton) explains how to make a simple router template to machine the pins. The tails are cut on the bandsaw. The price of "$19.99" includes $11 for a 23/32" diameter template guide and $8.95 for 1/2" 14 degree a dovetail bit. You probably already have these items. The simplified process:

    1. Rip a 5/16" thick template the same width as your drawer pieces.

    2. Use a dado to cut notches on one end of the template. One notch per tail.

    3. Clamp the template to the back side of the drawer front.

    4. With your router sitting on top of the template, run the router in and out of the notches.

    5. Use the cut pins to layout the tails.

    6. Cut the tails on your bandsaw.


    Comments / Questions


    Was this article helpful? Do you have any questions? E-Mail Us! We would love to hear from you!


PC4112 Review Page 2   More Tool Reviews