Leigh 24" Dovetail Jig


Introduction


Leigh Dovetail Jig 
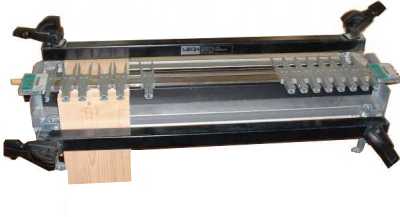
I purchased my Leigh 1258-24 dovetail jig about 15 years ago and have upgraded it to function identical to a Leigh D4. The key feature of the Leigh 1258/D4 dovetail jig is its ability to machine variable or equal-spaced, symmetrical and asymmetrical joints. Also, the Leigh offers very fine control of joint fit. I use our Leigh primarily for through dovetail joints. I have used the Leigh for half-blind dovetails, but I generally use our dedicated half-blind jig (PC 7116 Omnijig) or the AKEDA DC-16 for machining drawers and other "boxes" requiring the half-blind dovetail joint.

The Leigh dovetail jig has gone through some incremental changes over the years including adding the cam-action handles for the clamp bars, improved template holders, and perhaps the most important change, the new support edge guides. The original guide blocks, (used to align the sides of workpieces in the jig) were small and made of plastic. They were a problem to align perfectly and did not always provide satisfactory support. The new Leigh D4 edge guides are cast metal with adjustable edge pads. They provide a large support area and are much easier to adjust. Thanks to Leigh's modular design, you can retrofit older jigs with these new components as I have done. If you have the older jig and make the retrofits, make sure you purchase the new "D4" manual as well as the original manual will be obsolete.

I have received many emails that border on hate mail because I have not declared the Leigh dovetail jig as the best, the king, the jig without peers. I doubt few if any of my "detractors" have used their Leigh as much as I have used mine. I like the Leigh a lot. I have used it for many years. And yes, machining through dovetails is very easy with the jig. However, there are other jigs that compete with and, in some areas, beat the Leigh jig.

My advice in regards to choosing a dovetail jig is ask to yourself what features you require/want--then find the jig that best matches those requirements. I have compiled a comparison article that weighs the features of the AKEDA, Leigh, Keller, and PC 7116 Omnijig dovetail jigs. A few readers have responded that I have sleighted one or the other. Judge for yourself. You can produce excellent results using any of these jigs (AKEDA, PC 7116 Omnijig, Leigh, and the Keller). Which one is right for you? It depends on how often you plan on using the jig, what style of joints you plan to machine, what amount of setup time are you willing to spend for each project, what dovetail layout do you want to employ, etc. Luckily, I am in a position to choose the best jig for the project at hand.

Cost: $400.00 (approx.), plus optional bits, templates, bushing guides, etc.
Manufacturer: Leigh Industries Ltd.
P.O. Box 357
104-1585 Broadway St.,
Port Coquitlam, BC
Canada V3C 4K6

Tel: 604.464.2700
Tel: 1.800.663.8932
Fax: 604.464.7404
Leigh Email


What I Like About the Leigh Dovetail Jig


Easy to Install and Setup
Installation and setup was easy--the toughest part is aligning the upper and lower guide/stop blocks. This is much easier on the later model Leigh D4 jig, which as the new edge guide/stop blocks. In Dec 2002 I took our D1258 apart and reassembled it from scratch. Total time to reassemble it (using the D4 components) and setup the edge guides took about 1-1/2 hours, including making several test cuts.

Infinite and Variable Spacing (Layout)
Infinite spacing. You can arrange the through dovetail and half-blind joints anyway you want. This is probably the most important aspect of the jig.

  1. You don't have to design the widths of your drawer or box around the spacing of the dovetail template.

  2. You can create a drawer or box that appears to have "hand-cut" dovetails, with variable spacing rather than the perfectly equal "cookie-cutter" spacing other jigs produce.

  3. You can space the joints so that cutting off a lid from the main part of a box leaves full joints in view.
Variable spacing is great, but I suggest that you space your dovetails symmetrically for most projects. Asymmetrical layouts require that you make left/right (two) setups!

Through Dovetails Are A Piece of Cake
The Leigh makes machining through dovetail joints a very easy task. Anyone that can follow basic instructions can machine through dovetail joints in no time. Though test cuts are usually required for each new project, setup time is minimal. The only difficulty I have had is with guide bushing setup. More on this later.

Machine 1/4" Box Joints
The standard template can be used for machining 1/4" box joints. The setup is easy, requiring a 1/4" straight cutter and the standard 7/16" guide bushing. Spacing, in part, is handled by 3, 1/4" blocks you must manufacture--the more accurate the better. Leigh provides a PDF document that explains the whole operation in perfect detail at the following link: Leigh Support and Manuals. For more control of joint widths, you can purchase an accessory (F1) finger joint template for the Leigh dovetail jig for about $315.00. You can read about it at: Leigh Finger Joint Template. Note however, this additional accessory is not required to machine 1/4" box joints with the Leigh 1258/D4 dovetail jigs.

One Template Does It All
One template (set of guide fingers) is used for half-blind, through dovetail, 1/4" finger joints, angled joints, etc. Thus, you don't have a bunch of templates lying around. This is one reason why I have not invested in the extra templates available for the PC Omnijig.

Hairline Cursors on Template Ends
The template ends include an index window and hairlines that make it easier to register settings, return to settings, and make fine adjustments. Since I retrofitted by old jig with the D4 components, I found it helpful to paint the area around the support bar index arrow black, and sand/polish the arrow to standout. In retrospect, I should have done it the other way, but any contrast is better than none at all!

Handles a Wide Range of Work Piece Widths and Thicknesses
One jig with the standard template accepts a wide range of wood thicknesses and widths. However, you will need a variety of dovetail and straight bits to match the versatility of the jig. I use the #80 dovetail bit and #140 straight bit for most through dovetail operations.

Additional Templates and Accessories
Leigh offers additional sets of templates for a variety of joints including box, mortise and tenon, and some decorative joints. Leigh also offers a variety of accessories, guide bushings, etc. I don't like templates and things lying around, so I have not considered purchasing these additional templates.

Great Manual and Support
Legendary manual and good customer support. However, I do prefer the original manual to their latest manual. The new manual is almost too much! By the way, get the video!

Inexpensive Router Bits
Actually, I go back and forth on this one, but for cost reasons, I like the fact that the Leigh does not require special router bits with bearings (like our Keller, and ...). I have learned the hard way that you should purchase the precision template guide bushings from Leigh. Standard guide bushings are often machined off-center which can cause problems routing dovetails. Frankly, bearing guided bits are probably a better way to go, but they're much more expensive.

With that said, the Leigh does require a variety of bits, and because of the Leigh template thickness, long shank router bits are required. These bits are often sold as "Leigh" bits. Leigh also offers bits with a shank diameter of 8MM. This larger (larger than 1/4") diameter shank reduces vibration. The ID of the most commonly used guide bushing prevents the use of 1/2" diameter shank bits.

D4 Features are Retrofittable
The Leigh D4 features are retrofittable to older Leigh jigs! I have the older jig, yet I was able to retrofit it to the level of the "D4". Of course the retrofit doesn't come cheap. Plan on spending a bit over $100.00 for the new style clamp handles, template ends, and edge guides. And if you want the D4 manual and video, you'll spend another $30.00 plus dollars.


What I Don't Like About the Leigh Dovetail Jig


Tear-out
The Leigh is infamous for its tear-out problems on the front and back of work pieces. You setup a conventional half-blind dovetail jig to machine a side and a front/back simultaneously. This provides a built-in "backer" board which greatly reduces tearout.

The Leigh instructions and dozens of users have suggested ways to eliminate tear-out. Most suggestions don't work. Suggestions that don't work include applying packing tape and pre-cuttting the wood fibers with a marking knife.

Methods that help include making a left to right incise cut (this reduces front tear-out), using a backer and fronter board, proper technique, and sharp cutters. Woods like pine and oak tear-out more than walnut, poplar, and maple. Forget plywoods other than Baltic-birch and Apple-Ply for through dovetails.

I have many hours on the jig and I still get tear-out. For awhile I was so upset with the tear-out, I began machining through dovetail joints on the bandsaw. I also do them by hand for simplier projects (thanks to Frank Klausz.) But you can't beat a dovetail jig for speed.

It's One Work Piece at a Time
You machine one work piece at a time. Okay, this is typical for through dovetail jigs, but this is one reason why I use the Porter Cable Omnijig for half-blind dovetails, I can cut one front/back with one side simultaneously.

Half-Blind Dovetail Setup
Half-blind dovetails are a bit of a pain. First of all, unlike conventional jigs you only cut one work piece at a time. Second, you have to cut 1/4" thick spacers used as bridges/fillers between the template fingers. Third, make sure you have the right-sized bits. The dovetail bit delivered with my Leigh did not work with 3/4" drawer fronts.

Infinite Spacing is Great, but...
If you don't lay out the fingers to be symmetrical, you have to make two setups and the two setups must be exact mirrors of each other (for boxes and such where you're cutting off a lid which would highlight non-aligned tails/pins). I do vary the spacing, but I make sure it's symmetrical. The demonstrator at the show cheats with this a bit. He will demo some weird asymetrical layout, but only for one corner (two work pieces). He would have to make two setups (left and right) if he were to make a four-sided drawer or box. Shame, Shame, Shame! The D4 video does explain a simple method for setting up the mirror side of an asymmetrical layout.

You'll Need the Manual
Unless you use the Leigh frequently and you are like most folks, you'll probably have to read through the appropriate sections of the manual each time you use the jig. Plus, I have found that I cannot rely on the markings you place in the book for cutter/template setups--whether its caused by a difference in wood, routers, humidity, time of day, alignment of the planets and stars, I have not had any luck returning the jig to the "marked" settings. Thus, I always do test cuts for each project. This is not the case for our PC Omnijig, Keller, or AKEDA jigs. In my informal surveying of woodworkers that own the Leigh jig, few use it more than a couple of times a year. If that is the case, you better not lose the manual.

Guide Bushings
I have to arrived at the opinion that Guide Bushings are the root of all evil in regards to dovetail jigs that require them. I am not alone in this opinion (Pat Warner, router guru, agrees). More on this later.


The Bottom Line


The Leigh is an excellent dovetail jig. An excellent woodworking investment. I like the Leigh dovetail jig for machining through dovetail joints. I don't like it for machining half-blind joints. In fairness, many Leigh users have no problem machining either type of joint with the jig. For my money, it was worth it to purchase a dedicated half-blind dovetail jig like the PC4112 and the PC 7116 Omnijig.

For through dovetail joints, the Leigh offers advantages over the Keller and other similar jigs--primarily because of its infinite variable spacing capability. The trade-off is the Leigh is slightly more difficult to setup and use, and it is restricted in width capacity (24" maximum). And this is where the Keller shines as it could not be easier to use, does not require test cuts, and has no practical width limits.

So what is the bottom line? In the past I always said that if you wanted the absolutely most versatile dovetail jig, purchase the Leigh. If you want the easiest jig to setup and use, purchase a dedicated half-blind dovetail jig and the Keller through dovetail jig. But with the arrival of the AKEDA DC 16 dovetail jig, things are a bit more muddled. I have used the AKEDA DC 16 dovetail jig extensively. Like the Leigh, it produces through and half-blind dovetails, variable-spaced, symmetrical, or asymmetrical. However, its design makes dovetail layouts simpler than the Leigh, and has added features such as dust collection, one handed clamping, and so forth. I came up with a comparison chart of features and a weighted rating scale that might help decide between all of these excellent jigs.

Rating: saw score saw score saw score saw score saw score out of 5!


A Few Suggestions - Notes


  • Check out my drawer making tutorial.

  • Reduce tear-out by fronting and backing the work piece with sacrificial boards, using sharp cutters, using a steady feed, taking light cuts, incising the cut where possible, and cutting in a direction that provides as much support as possible for the area being cut. Learn the proper techinque for handling the router and making the cuts as described in the handbook. Techniques you need to employ include steadiness, feed speed, and direction of cut.

  • Mask tear-out after the project is assembled by smearing glue or epoxy into the tear-out area and sanding the area. The sanding dust will mix with the glue to fill the tear-out. It isn't perfect, but it fixes smaller imperfections.

  • Don't rotate the router as you're machining the joints. The template guides are not always perfectly centered with the router bit. Any slight imperfection here seems to multiply several times which can result in poorly fitting joints. Consider purchasing the Leigh guide bushings, they're much more precise than typical bushings. By the way, the diameter of guide bushings is not as critical with the Leigh as with other jigs.

  • Bent fingers. After reassembling our Leigh, I had problems with gaps at one joint for each corner (upper/left, lower/right). This is typically caused by a bent Leigh finger. If you're having difficulty with gaps at more than joint, and you have followed the instructions to the "T", poorly machined or off center guide bushings are the likely cause of the problem. The Keller has taught me the benefit of bearing-guided bits.

  • Use a 1-1/2 HP router or greater. The power is needed to keep the cutter speed consistent. The weight actually helps keep the router planted flat on the finger template.

  • Sharp bits reduce tear-out and uneven bottoms. Consider purchasing the Leigh 8mm bits. If you use the jig a lot, you will probably want to invest in two sets of bits. That way you'll have one set in the shop while the others are being sharpened. I touch up by bits with a fine and extra-fine ceramic stone. It seems to help.

  • Test cuts are a necessity. Consequently, when you are milling your work pieces, always cut a few "spares" for testing.

  • Your work pieces need to be square and flat. Don't use the clamp bars to flatten work pieces--it will catch up with you later when you assemble the box.

  • Use eye and ear protection. Unlike shaping operations which usually only take a few minutes, machining joints for cabinet drawers can take hours of continuous router use. Protect your eyes and ears!

  • Wear a smock to facilitate casting off the ton of stringy chips that are thrown back. Leigh offers a chip collection port. Consider purchasing the Leigh RVA (Router Vacuum Attachment). It works with most routers and sucks the chips and dust almost directly from the cutter.

  • If you're going to use plywood for the drawer parts, use Baltic Birch, ApplePly, or another of the finer plywoods. Your typical veneer hardwood plywoods tend to chip and tear.

  • When making drawers, I use a rip blade to dado the slot for the drawer bottom. A trick I learned from the Frank Klausz tape: After you have finished the last pass for the last drawer side/front, raise the blade and rip the bottom of the back piece. Thus the width of the back piece will be equal to the distance from the drawer side/front top edge to the top edge of the drawer bottom dado. Later, when assembling the drawer, you can slide the bottom in from the back and nail it to the bottom of the back piece. Works great!

  • Copy the handbook and keep it near the jig.

  • Practice, practice, practice. But practice actually making things (boxes, footstools, drawers), not two workpiece corners like the demo guys. Practice using pine or poplar. Pine teaches you to be careful. Poplar tears out less and is more forgiving.

  • Contact Leigh Industries if you have difficulties. They will bend over backwards to assist you.

  • The March/April 1993 Issue of Fine Woodworking ran a great article by John Lively about making Drawers using the $100-type Half-Blind jig. The best article I have found on the subject. It pretty much covers the subject soup to nuts. The article can be adapted to using the Leigh as well.


Template Guide Bushings


Guide bushings (also known as collars or a guide bush) are extremely versatile and indispensible for many router operations. However, I have learned the hard way that guide bushings can be a source of fit problems when used with dovetail jigs, especially combination jigs like the Leigh and the AKEDA.

I have found two common problems with guide bushings:

  • They are often poorly machined. Their diameter and out-of-center tolerances vary greatly. I have guide bushings that are .030" out-of-center!. The best bet is to purchase precision guide bushings from Leigh, AKEDA (through Woodcraft), or whomever. Leigh offers precision 7/16" and 5/8" OD bushings, AKEDA offers a 7/16" precision bushing. The 7/16" OD bushing is the most widely used bushing with the Leigh and AKEDA dovetail jigs. The PC4112/PC7116 jigs use the 5/8" OD bushing. Note that for through and half-blind dovetails, the guide diameter is not super critical on the Leigh, since fit is controlled by moving the pin template out/in (through dovetails) or by raising/lowering the bit (half-blind dovetails).

  • Even if you have precise guide bushings, depending on your router, it may be difficult to center the router bit within the guide bushing. Centering the router bit to a guide bushing is easier said than done. For instance, Porter-Cable routers mount their base to the router using flat head screws. As you tighten the screws, they center themselves in the base, drawing the base to "their center". Thus trying to center them is almost impossible. Some Bosch bases (1617 for instance) are mounted with pan-head screws, which do allow for some adjustment. However, you still may not be successful in perfectly centering the base, bushing, and bit (even with their centering cone).

To determine whether your bit is centered in the guide bushing, simply lower the bit into the bushing, rotate the bit, and look to see whether the tips of the bit are centered within the bushing for an entire rotation. Since a dovetail bit is angled, you can lower it into the guide bushing until it barely touches--just make sure to rotate it backwards. Or, better yet, perform the following:

  1. Mount the guide bushing and a straight bit in the router. The straight bit diameter must be less than the OD of the guide bushing.
  2. Setup your DT jig guide fingers to cut tails.
  3. Clamp a test board under the tail guides.
  4. Run the router through several guides.
  5. Visibly inspect the cut to determine that the cut is centered within the tail finger space. If it is centered, you're done.
  6. Otherwise, loosen the guide bush, rotate it 1/4 turn, and tighten it again.
  7. Repeat these steps until you get a satisfactory cut. You might want to mark the face of the guide bushing and router base to simplify this procedure next time around.
  8. If you cannot get the bit to center with the guide bush, try another guide bush. If you still have problems, you can try centering the base of the router/guide bush to the bit, but again, this is easier said than done.
  9. If you cannot correct the off-center problem, you might lessen the problem if you rotate the bushing so that the greatest deviation faces away from the jig (towards the operator). Then, make sure you keep the router facing the same direction as you rout the dovetails.


Machining Through Dovetails


Machining through dovetails using the Leigh or Keller is a piece of cake. The procedure is as follows:

  1. Mill your drawer/box pieces square and flat. Size them to the finished dimensions, plus 1/32" or so on the length.

  2. Layout and your workpieces: Left Side Face, Right Side Face, Front Face, Back Face , similar to the method discussed for half-blind dovetails. Mark the bottom of each workpiece. With the Keller, you need to decide which edge (top or bottom) will be your common reference. Keller (and I agree) suggests that you use the bottom edge as your common reference. Thus, your dados for the bottom panel will align. The top edges may not line up perfectly, but this is easily remedied by planing the top edges once the box/drawer is assembled.

  3. Always begin with the tail boards and cut all of the tail boards before cutting your pin boards. The Keller won't require any pin adjustment (you adjusted this when you originally setup the Keller). All Leigh adjustment is done using the pin template.

    Cutting the Tails

  4. Leigh: Clamp a tail board (face towards the jig) against the edge stop and the underside of the guide template. Adjust the desired dovetail layout using the pin template. Once you have the layout set and the fingers tightended down, flip the template to the tails side.

    Keller Tail Board

  5. Keller: Clamp a tail board in your vise and clamp the dovetail template to the work piece. I size my drawer/box to match the spacing of the dovetail template. To determine the exact drawer/box height, I use multiples of 1-1/8". Then I place the dovetail template over the tail board, so that the edges of the boards are equi-distant from their adjacent template fingers. When all is said and done, I end up with equally-sized half-pins. The Keller Instruction Guide recommends that you mark lines 5/16" to the left and right of the center line of workpiece edge. Then, align the template over the workpiece edge so that a template finger sits within your two lines. Finally, clamp a stop against the "bottom" edge of the work piece.

  6. Place your dovetail cutter in the router and adjust its depth to cut the thickness of the pin work piece, plus 1/64". I Scribe a line on the front side of the tail board by butting the "pin" board against the "tail" board, under the tail template and scribing the line using the pin board as the marking edge. Set the router on the template and lower the bit to intersect your scribed depth line. Unlike half-blind dovetail jigs, the depth of cut for through dovetails does not affect the dovetail fit. It only controls how far the tails/pins protrude.

  7. Cut all of your tail boards. On the Keller, you want to keep the bottom edge of all work pieces against your stop. Thus after cutting one end, you will flip the work piece (like a river boat paddle) rather than rotating it (like a propeller). Consequently, for one cut the face will be towards the backing board and will face way from the backing board for the second cut. On the Leigh, make sure the tail board is faced towards the jig, away from the operator.

    Cutting the Pins

  8. Place the straight cutter in the router and adjust its depth to cut the thickness of the tail work piece, plus 1/64" using the method described for the dovetail cutter above.

  9. Leigh: Place a test pin board in the jig. Rout the test piece and check for fit. Adjust the pin template as necessary. Once it is adjusted correctly, machine all pin boards.

  10. Keller Method 1:
    1. Clamp a pin board in your vise, outside face away from the jig.
    2. Place its mating tail board corner on the end of the pin board in its correct position, relative to the finished product (make sure top/bottom edges are aligned) and scribe the first tail socket onto the pin board. Keller suggests that you use a pocket knife. Make sure the blade rides on tail socket edge, not the socket wall.
    3. Place the pin template on the work piece. Line up a finger of the pin template between the scribed lines.
    4. Machine the pin board end.
    5. Repeat all steps for each pin board end.


  11. Keller Method 2:
    1. Clamp a pin board in your vise, outside face away from the jig.
    2. Place its mating tail board corner on the end of the pin board in its correct position, relative to the finished product (make sure top/bottom edges are aligned) and scribe the first tail socket onto the pin board. Keller suggests that you use a pocket knife. Make sure the blade rides on tail socket edge, not the socket wall.
    3. Place the pin template on the work piece. Line up a finger of the pin template between the scribed lines.
    4. Clamp an edge stop along the bottom edge of the work piece.
    5. Machine the one end of each pin board that shares the bottom edge/face away orientation.
    6. Remove the edge stop. Repeat the scribe and edge stop setup (stop will be on the opposite side) for the pin board ends you have not machined.
    7. Machine the remaining pin board ends.


Alternatives and Other Jigs


Don't discount making through dovetail joints by hand or the hybrid method employing both the bandsaw and hand. If you're not doing a ton of through dovetail joints, doing them by hand makes sense. If you're a novice at making through dovetail joints by hand, buy or rent the Dovetail a Drawer video by Frank Klausz. Actually, this video teaches alot more than just dovetails. I found his general woodworking techniques to be very enlightening.

I came up with a chart comparing the Keller, Leigh, AKEDA, and PC Omnijig dovetail jigs. Click here to view it.

Here is a run down of Dovetail jigs you might consider:

  • AKEDA DC-16 Through and Half-Blind Dovetail Jig
    The AKEDA DC-16 from AKEDA Jigs Incorporated is the new guy on the block and certainly is a must-consider dovetail jig. Without any adjustments, the jig produced flawless, variably-spaced through dovetails for a box on my first try. I had the same experience with my first drawer. The jig comes through on its promises: no adjustments, excellent dust collection, virtually no setup, dovetail layout is easy and repeatable. It is quite simply a joy to use. Also, I like the geometry of the dovetails. They're more aesthetically pleasing than most machine-produced dovetails. Woodcraft handles the distribution of the AKEDA DC-16 for the U.S.

  • Leigh D4 Through and Half-Blind Dovetail Jig
    The Leigh dovetail jig Leigh Industries, Ltd. Is considered one of the best jigs on the market. I have had one for many years and like it for through dovetails. Leigh offers an extensive array of accessories that allow you to mill mortise and tenons, a variety of box joints, and decorative joints.

  • Porter Cable 16" and 24" (5116 and 7116) Dovetail Jigs
    The Porter Cable #5115 and #7116 jigs run $350 and $400, respectively. They are among the most robust jigs on the market. Porter Cable offers a variety of optional templates to compete with the Leigh as being the most versatile dovetail jig available. Someday we'll get around to publishing a review on it.

  • Porter Cable 12" 4112 Half-Blind Dovetail Jig
    The Porter Cable #4112 dovetail jig runs about $100 and is for my money, the best HB dovetail jig around. Click here to read my PC4112 review.

  • Keller Through Dovetail Jig
    The Keller is considered by some as the easiest-to-use through Dovetail jig. I agree! Models run $150-$450. I purchased my Keller 1601 from Seven Corners Hardware for $189.00, which is considerably less than the show price ($209) or the suggested retail price ($249). Check out the Keller web site! It provides some great info and a gallery of work from Keller users!

  • Woodrat Dovetail/Joinery Jig
    The Woodrat is perhaps the most unique dovetail (joinery) jig on the market, and thus appears to have the largest learning curve. I have not used the jig, but it gets high points for versatility and creative/artistic capacity. Setups appear to be more complex than typical jigs. Runs in the neighborhood of $500.

  • RBI Wood Tools
    RBI sells a PC 4112 look-alike for $100.

  • Hartville Tools Model 12378
    The 12378 is another PC4112 look-alike for $100. Hartville sells aftermarket cam-action clamps for the 12378 that also fit the PC 4112.

  • Woodhaven Dovetail Jigs
    Woodhaven sells a variety of dovetail jigs including their new top-of-the-line jig that can be used in the conventional mode or on top of a router table.

  • Sears Craftsman Dovetail Jigs
    Don't laugh, my father uses one of the cheaper models with excellent results. I recently gave him my old Woodstock Intl jig so he might retire the Craftsman, but don't count on it.

  • Woodstock Intl Half-Blind Dovetail Jig W1099
    This jig, also sold by Harbor Freight (Central Machine) and others, runs between $40 and $60. It works pretty well.

  • Katie Jig
    A relatively new jig that has received good reviews. It runs $250 plus. Marc Sommerfeld demos the Katie at the Woodworking shows. Impressive in that you can clamp a tail and pin board in the jig at one time (given you're cutting them on a router table). This ensures the alignment of the top/bottom edges and could be a real time saver if you had a two router setup like Marc Sommerfeld has at the shows. One drawback I saw in the demo is that the tails/pins top/bottom orientation is swapped on each end, unless you had two setups. If you get a chance to attend the WW Shows, look at the side of Marc Sommerfeld's drawers and you'll see what I mean. Functionally sound, but......

  • Stots Dovetail Template Master
    You use this template master to make dovetail and box joint jig templates. You can use it to make templates of virtually any size. It runs about $50 plus another $30 for the router bits if you don't have them. I want to try this tool, but I just have not had the time to fool around with it. Review coming soon.

  • Incra and Jointech Router Fence Incremental/Positional Jigs
    I would not consider the Incra and Jointech jigs for production work, but they work well if you are up to the setup. They work as advertised, but are time consuming to setup and use compared with dedicated dovetail jigs. For what it's worth, I prefer the Jointech positioner over the Incra. The Jointech is more roubust, uses leadscrew technology instead of the incremental racks, templates are easier to use, provides built-in centering, and their fence construction and design is excellent.

  • The $19.99 Half-Blind Dovetail Jig
    The Popular Woodworking September 1999 issue ran an article on a $19.99 half-blind dovetail jig. Click here to view the article in PDF Format. The author (Troy Sexton) explains how to make a simple router template to machine the pins. The tails are cut on the bandsaw. The price of "$19.99" includes $11 for a 23/32" diameter template guide and $8.95 for 1/2" 14 degree a dovetail bit. You probably already have these items. The simplified process:
    1. Rip a 5/16" thick template the same width as your drawer pieces.

    2. Use a dado to cut notches on one end of the template. One notch per tail.

    3. Clamp the template to the back side of the drawer front.

    4. With your router sitting on top of the template, run the router in and out of the notches.

    5. Use the cut pins to layout the tails.

    6. Cut the tails on your bandsaw.


Questions


If you have any questions, E-Mail Us!