|
Page Directory
Introduction
What I Like
What I Don't Like
Suggestions
Guide Bushings
Machining TDs
Alternatives
Site Directory
Home
Tool Reviews
Projects & Plans
Articles
Our Shop
FAQs
Sites I Like to Visit
Build a Kayak
E-Mail Me!
|
|
- Check out my drawer making tutorial.
- Reduce tear-out by fronting and backing the work piece with sacrificial boards, using sharp cutters, using a steady feed, taking light cuts, incising the cut where possible, and cutting in a direction that provides as much support as possible for the area being cut. Learn the proper techinque for handling the router and making the cuts as described in the handbook. Techniques you need to employ include steadiness, feed speed, and direction of cut.
- Mask tear-out after the project is assembled by smearing glue or epoxy into the tear-out area and sanding the area. The
sanding dust will mix with the glue to fill the tear-out. It isn't perfect, but it fixes smaller imperfections.
- Don't rotate the router as you're machining the joints. The template guides are not always perfectly centered with the router bit. Any slight imperfection here seems to multiply several times which can result in poorly fitting joints. Consider purchasing the Leigh guide bushings, they're much more precise than typical bushings. By the way, the diameter of guide bushings is not as critical with the Leigh as with other jigs.
- Bent fingers. After reassembling our Leigh, I had problems with gaps at one joint for each corner (upper/left, lower/right). This is typically caused by a bent Leigh finger. If you're having difficulty with gaps at more than joint, and you have followed the instructions to the "T", poorly machined or off center guide bushings are the likely cause of the problem. The Keller has taught me the benefit of bearing-guided bits.
- Use a 1-1/2 HP router or greater. The power is needed to keep the cutter speed consistent. The weight actually helps keep the router planted flat on the finger template.
- Sharp bits reduce tear-out and uneven bottoms. Consider purchasing the Leigh 8mm bits. If you use the jig a lot, you will probably want to invest in two sets of bits. That way you'll have one set in the shop while the others are being sharpened. I touch up by bits with a fine and extra-fine ceramic stone. It seems to help.
- Test cuts are a necessity. Consequently, when you are milling your work pieces, always cut a few "spares" for testing.
- Your work pieces need to be square and flat. Don't use the clamp bars to flatten work pieces--it will catch up with you later when you assemble the box.
- Use eye and ear protection. Unlike shaping operations which usually only take a few minutes, machining joints for cabinet drawers can take hours of continuous router use. Protect your eyes and ears!
- Wear a smock to facilitate casting off the ton of stringy chips that are thrown back. Leigh offers a chip collection port. Consider purchasing the Leigh RVA (Router Vacuum Attachment). It works with most routers and sucks the chips and
dust almost directly from the cutter.
- If you're going to use plywood for the drawer parts, use Baltic Birch, ApplePly, or another of the finer plywoods. Your typical veneer hardwood plywoods tend to chip and tear.
- When making drawers, I use a rip blade to dado the slot for the drawer bottom. A trick I learned from the Frank
Klausz tape: After you have finished the last pass for the last drawer side/front, raise the blade and rip the bottom of the back piece. Thus the width of the back piece will be equal to the distance from the drawer side/front top edge to the top edge of the drawer bottom dado. Later, when assembling the drawer, you can slide the bottom in from the back and nail it to the bottom of the back piece. Works great!
- Copy the handbook and keep it near the jig.
- Practice, practice, practice. But practice actually making things (boxes, footstools, drawers), not two workpiece corners like the demo guys. Practice using pine or poplar. Pine teaches you to be careful. Poplar tears out less and is more forgiving.
- Contact Leigh Industries if you have difficulties. They will bend over backwards to assist you.
- The March/April 1993 Issue of Fine Woodworking ran a great article by John Lively about making Drawers using
the $100-type Half-Blind jig. The best article I have found on the subject. It pretty much covers the subject
soup to nuts. The article can be adapted to using the Leigh as well.
 Guide bushings (also known as collars or a guide bush) are extremely versatile and indispensible for many router operations. However, I have learned the hard way that guide bushings can be a source of fit problems when used with dovetail jigs, especially combination jigs like the Leigh and the AKEDA. Guide bushings (also known as collars or a guide bush) are extremely versatile and indispensible for many router operations. However, I have learned the hard way that guide bushings can be a source of fit problems when used with dovetail jigs, especially combination jigs like the Leigh and the AKEDA.
I have found two common problems with guide bushings:
- They are often poorly machined. Their diameter and out-of-center tolerances vary greatly. I have guide bushings that are .030" out-of-center!. The best bet is to purchase precision guide bushings from Leigh, AKEDA (through Woodcraft), or whomever. Leigh offers precision 7/16" and 5/8" OD bushings, AKEDA offers a 7/16" precision bushing. The 7/16" OD bushing is the most widely used bushing with the Leigh and AKEDA dovetail jigs. The PC4112/PC7116 jigs use the 5/8" OD bushing. Note that for through and half-blind dovetails, the guide diameter is not super critical on the Leigh, since fit is controlled by moving the pin template out/in (through dovetails) or by raising/lowering the bit (half-blind dovetails).
- Even if you have precise guide bushings, depending on your router, it may be difficult to center the router bit within the guide bushing. Centering the router bit to a guide bushing is easier said than done. For instance, Porter-Cable routers mount their base to the router using flat head screws. As you tighten the screws, they center themselves in the base, drawing the base to "their center". Thus trying to center them is almost impossible. Some Bosch bases (1617 for instance) are mounted with pan-head screws, which do allow for some adjustment. However, you still may not be successful in perfectly centering the base, bushing, and bit (even with their centering cone).
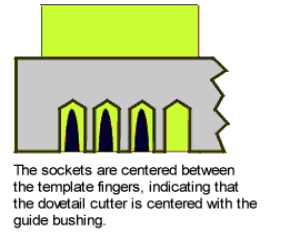 To determine whether your bit is centered in the guide bushing, simply lower the bit into the bushing, rotate the bit, and look to see whether the tips of the bit are centered within the bushing for an entire rotation. Since a dovetail bit is angled, you can lower it into the guide bushing until it barely touches--just make sure to rotate it backwards. Or, better yet, perform the following: To determine whether your bit is centered in the guide bushing, simply lower the bit into the bushing, rotate the bit, and look to see whether the tips of the bit are centered within the bushing for an entire rotation. Since a dovetail bit is angled, you can lower it into the guide bushing until it barely touches--just make sure to rotate it backwards. Or, better yet, perform the following:
- Mount the guide bushing and a straight bit in the router. The straight bit diameter must be less than the OD of the guide bushing.
- Setup your DT jig guide fingers to cut tails.
- Clamp a test board under the tail guides.
- Run the router through several guides.
- Visibly inspect the cut to determine that the cut is centered within the tail finger space. If it is centered, you're done.
- Otherwise, loosen the guide bush, rotate it 1/4 turn, and tighten it again.
- Repeat these steps until you get a satisfactory cut. You might want to mark the face of the guide bushing and router base to simplify this procedure next time around.
- If you cannot get the bit to center with the guide bush, try another guide bush. If you still have problems, you can try centering the base of the router/guide bush to the bit, but again, this is easier said than done.
- If you cannot correct the off-center problem, you might lessen the problem if you rotate the bushing so that the greatest deviation faces away from the jig (towards the operator). Then, make sure you keep the router facing the same direction as you rout the dovetails.
Machining through dovetails using the Leigh or Keller is a piece of cake. The procedure is as follows:
- Mill your drawer/box pieces square and flat. Size them to the finished dimensions, plus 1/32" or so on the length.
- Layout and your workpieces: Left Side Face, Right Side Face, Front Face, Back Face , similar to the method discussed for half-blind dovetails. Mark the bottom of each workpiece. With the Keller, you need to decide which edge (top or bottom) will be your common reference. Keller (and I agree) suggests that you use the bottom edge as your common reference. Thus, your dados for the bottom panel will align. The top edges may not line up perfectly, but this is easily remedied by planing the top edges once the box/drawer is assembled.
- Always begin with the tail boards and cut all of the tail boards before cutting your pin boards. The Keller won't require any pin adjustment (you adjusted this when you originally setup the Keller). All Leigh adjustment is done using the pin template.
Cutting the Tails
- Leigh: Clamp a tail board (face towards the jig) against the edge stop and the underside of the guide template. Adjust the desired dovetail layout using the pin template. Once you have the layout set and the fingers tightended down, flip the template to the tails side.

- Keller: Clamp a tail board in your vise and clamp the dovetail template to the work piece. I size my drawer/box to match the spacing of the dovetail template. To determine the exact drawer/box height, I use multiples of 1-1/8". Then I place the dovetail template over the tail board, so that the edges of the boards are equi-distant from their adjacent template fingers. When all is said and done, I end up with equally-sized half-pins. The Keller Instruction Guide recommends that you mark lines 5/16" to the left and right of the center line of workpiece edge. Then, align the template over the workpiece edge so that a template finger sits within your two lines. Finally, clamp a stop against the "bottom" edge of the work piece.
- Place your dovetail cutter in the router and adjust its depth to cut the thickness of the pin work piece, plus 1/64". I Scribe a line on the front side of the tail board by butting the "pin" board against the "tail" board, under the tail template and scribing the line using the pin board as the marking edge. Set the router on the template and lower the bit to intersect your scribed depth line. Unlike half-blind dovetail jigs, the depth of cut for through dovetails does not affect the dovetail fit. It only controls how far the tails/pins protrude.
- Cut all of your tail boards. On the Keller, you want to keep the bottom edge of all work pieces against your stop. Thus after cutting one end, you will flip the work piece (like a river boat paddle) rather than rotating it (like a propeller). Consequently, for one cut the face will be towards the backing board and will face way from the backing board for the second cut. On the Leigh, make sure the tail board is faced towards the jig, away from the operator.
Cutting the Pins
- Place the straight cutter in the router and adjust its depth to cut the thickness of the tail work piece, plus 1/64" using the method described for the dovetail cutter above.
- Leigh: Place a test pin board in the jig. Rout the test piece and check for fit. Adjust the pin template as necessary. Once it is adjusted correctly, machine all pin boards.
- Keller Method 1:
- Clamp a pin board in your vise, outside face away from the jig.
- Place its mating tail board corner on the end of the pin board in its correct position, relative to the finished product (make sure top/bottom edges are aligned) and scribe the first tail socket onto the pin board. Keller suggests that you use a pocket knife. Make sure the blade rides on tail socket edge, not the socket wall.
- Place the pin template on the work piece. Line up a finger of the pin template between the scribed lines.
- Machine the pin board end.
- Repeat all steps for each pin board end.
- Keller Method 2:
- Clamp a pin board in your vise, outside face away from the jig.
- Place its mating tail board corner on the end of the pin board in its correct position, relative to the finished product (make sure top/bottom edges are aligned) and scribe the first tail socket onto the pin board. Keller suggests that you use a pocket knife. Make sure the blade rides on tail socket edge, not the socket wall.
- Place the pin template on the work piece. Line up a finger of the pin template between the scribed lines.
- Clamp an edge stop along the bottom edge of the work piece.
- Machine the one end of each pin board that shares the bottom edge/face away orientation.
- Remove the edge stop. Repeat the scribe and edge stop setup (stop will be on the opposite side) for the pin board ends you have not machined.
- Machine the remaining pin board ends.
|

