|
Page Directory
Introduction
Specifications
Make a Template
Mill Door Parts
Mill Rails
Mill Stiles
Mill Top Rail
Additional Tips
Site Directory
Home
Tool Reviews
Projects & Plans
Articles
Our Shop
FAQs
Sites I Like to Visit
Build a Kayak
E-Mail Me!
|
|
I recently purchased the Sommerfeld Ogee Raised Panel router bit set. I have a shaper one-piece rail and stile cutter but decided the individual rail and stile bits, such as those in the Sommerfeld set would be a little easier to setup and use. Something I realized when machining the top arched rail, you really need two router tables. If not, you must attach and remove your top rail template (and raised panel template) two times for each work piece.
The beauty of the Sommerfeld Raised Panel set is that if you mill your door components to the Sommerfeld-stated dimensions, determining rail lengths and the panel size is a piece of cake. Sommerfeld suggests that you mill the door stiles and bottom rail to 2-7/16". I milled the stiles to this dimension, but I prefered a much wider bottom rail (4-1/4"). Regardless, if you mill your stiles to the 2-7/16", your rail length is determined by this formula:
Rail Length = Outside door width - 4"
So if your outside door width is 19-1/2", crosscut your rails to 15-1/2". Pretty simple!
Sommerfeld Tools sells a great set of Arched and Cathedral Arch templates. They're a great buy at $80.00, but I decided I could make my own for nothing. I make my patterns using CorelDraw. For the money, this program is hard to beat. If you use its tool roll ups to set dimensions and angles, the dimensions will be exact. Here are the steps I followed to create my Single Arch Top Rail and Raised Panel templates:
- Launch CorelDraw and click on "Create New Graphic".
- Set the page to Landscape and the horizontal size to approximately 1 inch wider than your template length. In my case I needed a 15-1/2" wide template, so I set the page size to 16-1/2". Set the page size using page setup menu: Layout -> Page Setup.
- Draw an arbitrarily-sized rectangle using the rectangle tool.
- Size the rectangle using the Transform Size roll up (ALT-F10). Set the H value to your rail length (15.5" in my case) and the V value to your rail height (4.4375" in my case).
- Center the rectangle on the page (CTRL-A, Center to Page).
- Select your rectangle and resize it using the Size tool (ALT-F10). Set the H value to approximately 2/3s the rail length. Set the V value to your arch height (2-7/16" or 2.4375" in my case).
- Align the two rectangles to their top edges. Do not group them.
- Select the main rectangle.
- Create the arch using the Effects Envelope tool (CTRL-F7).
- I selected the single arch icon. Select the double arch icon for catheral doors.
- Click "Add New".
- The rectangle selection changes to allow you to form the arch. Select the bottom center target point and move the cursor up until it intersects with the bottom of your reference rectangle.
- Click the left-mouse button and click on "Apply" in the Envelope roll up.
- You can make the raised panel template in the same manner, but instead of creating the arch using the bottom center target point, use the top center target point.
- Add a vertical line the width of the template and center it on the arched template. You'll use this to line up the template with the actual top rail work pieces.
- Optionally add 3" rectangles at each end of the template. These "ears" are for safety when routing. They will extend beyond the ends of the rail, providing a starting point for the template pattern cutter and stile pattern cutter. Typically I do not bother adding the ears on the paper pattern but I make a mental note to cross cut my hardboard template material 6" longer than the top rail, then I center the pattern on the hardboard. Either way, you want these ears for safety reasons.
- Optionally label the template with its length (15-1/2") and two widths (4-1/4" and 2-7/16").
- Group all objects.
- Save your file.
- Print the template. Unless your printer accepts extra long paper, select the Print Tiled Pages option (File -> Print -> Layout -> Print Tiled Pages).
- I rubber cement the pattern to a piece of hardboard. In this case my hardboard template measured 1/4" x 4-1/4" x 22". I cut out the template using a bandsaw and the sand to the pattern line using a spindle sander.
Click here to view a sample template I created using CorelDraw (PDF format)
Click here to view a sample template I created using CorelDraw (GIF format)
I like to layout each door frame on ONE board. This way I know the thickness of the workpieces will be the same, the color and grain will as close as possible, and so forth.
Under Construction
| Under Construction | 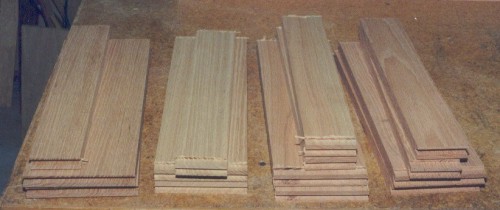
|
Under Construction, but a few notes:
- You really need two router tables. Setup table 1 to mill (trim) the top rail to your template using a pattern template router bit. Setup the table 2 to mill the Ogee pattern and panel dado. If you do not use two router tables, you must attach and remove the template for each top rail you're milling for the two operations.
Under Construction
Was this article helpful? Do you have any questions? E-Mail Us! We would love to hear from you!
|