It is hard to beat a crosscut fixture / sled for making crosscuts on the table saw. Various types
of crosscut fixtures exist:
One sided fixtures that support stock on the right or left of the blade.
Two sided fixtures that straddle the blade.
Fixed fence fixtures, fixed at 0°, 45°, or any where in between.
All of the popular woodworking magazines have run articles on building your own. In fact the
Wood Magazine site offers a set of plans that you can access for free. The bottom line is anyone can
build a fixed fence crosscut fixture in a few hours or less.
You can purchase crosscut sleds from a number of vendors: In-Line Industries (The Dubby), Delta, Jointech (Smart Miter),
Incra-Taylor Design, Biesemeyer, Woodhaven, to name a few. For all around simplicity and function, the Dubby from In-Line
Industries is hard to beat. The Dubby is purchased as either a right-side or left-side fixture. Its fence rotates in
an arc to provide 0° to 50° angles. My second choice is the Biesemeyer. The Biesemeyer straddles the blade thus can
be used to cut on either side of the blade. It has a fixed fence at 0°. The other sleds function better than their
miter gauge counterparts but have limitations not exhibited in the Dubby and Biesemeyer.
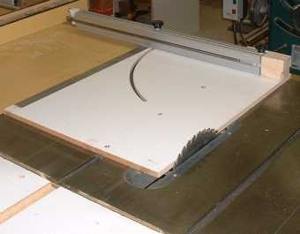
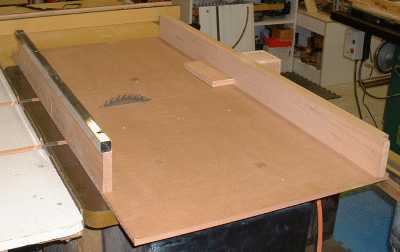
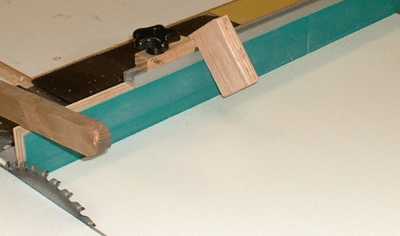
The following are images of crosscut sleds I use in the shop:
These are the steps I follow to make a fixed fence crosscut fixture:
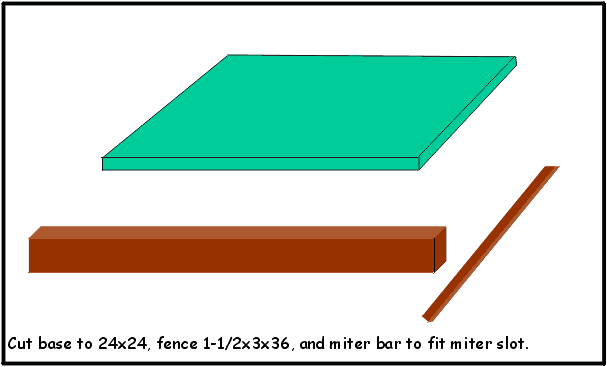
Rip and crosscut your base to the desired dimension. I typically use particle board or MDF, 3/8" to 1/2" thick. A good dimension is <> 24" x 24".
Run a shallow dado the length of the base for the miter bar, using your fence for accuracy. Run the dado so that approximately 1" of the base will be cut off when you mount the miter bar and run the sled through the blade.
Rip and crosscut a piece of hardwood (maple, ash, oak) for the miter bar. It should fit in the miter slot with no slop. I begin by fitting a board that will fit in the slot edge-wize. Plane or sand the board until it fits. Then rip the desired number of miter bars from the board. You can also purchase miter bars in steel or in UHMW from JDS (steel), Hartville (UHMW), Mighty Track (UHMW), and other sources.
Drill and countersink holes in the base centered above the miter bar dado.
Screw the base to the miter bar.
Place the base in the saw's miter slot and run it through the saw. This provides a "zero" reference.
Rip and crosscut material for a fence. I have used everything from Melamine to maple. The key is it must be flat and straight.
Screw the end of the fence closest to the blade to the base. Drill and countersink an oversized hole through the base at the far end and run a screw through the hole into the fence. This will allow you to adjust the fence during the next step. By the way, screw the fence to the leading edge of the base for fixtures used to cut wide panels. Screw the fence to the
trailing edge for cutting normal sized workpieces.
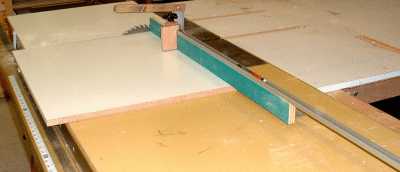
To square the fence to the blade:
Use a reliable carpenter's square to square the fence to the "zero" reference edge of your sled.
Select a test workpiece of plywood, approx. 20" x 20".
Cut and rotate the piece so that you have cut all four sides using your fixture.
Measure and compare the diagonals (corner to corner). If they are equal, screw the fence down in two or three additional places. Otherwise, adjust the fence and try again.
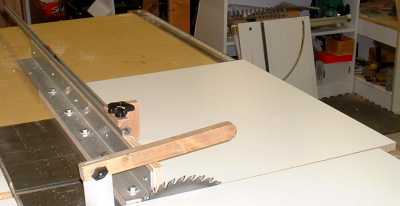
There are numerous ways to calibrate a crosscut fixture to be square with the blade. Unfortunately, using a carpenter's square or even an engineer's square does not always cut it. There are three methods that are regarded as being the best practice methods for squaring a crosscut fixture. Above, I describe and demonstrate calibrating a crosscut fixture using the method suggested by In-Line Industries. However, other manufacturers recommend the Five-Step method. For absolute accuracy, I recommend the Five-Step, Five-Cut Method. Click Here to View and Read About Table Saw and Crosscut Fixture Alignment/Squaring.
Crosscut sleds are generally safer than typical miter gauges because of the backstop and base support they give to the workpiece.
However, most sleds prevent the use of the typical blade guards, which is probably why many professional shops employ overhead guards.
Suffice it to say, be extra careful when using a crosscut fixture without a blade guard. The best bet: Use an overhead
blade guard or a fixed blade guard on the crosscut fixture.
Don't let the workpiece rotate even a fraction of a inch when pulling a crosscut fixture back after a crosscut.
If the work piece catches the blade on the way back, you will see first hand the absolute worst
type of kick-back. But, it happened to me! I know. The middle finger of my left hand is 5/8" shorter due to such a kickback.
Only the grace of God saved me from losing my head--literally, as the shelf I was crosscutting flew past me like a Frisbee.
To prevent this, the width of the Dubby miter bar is intended to be approximately .003" less than the width of your miter slot. When you make
a cut, you push the Dubby forward and towards the blade. On the return, you pull it backward and away from the blade.
Don't let the workpiece drop on top of the running blade. Sounds like common sense doesn't it? But when you're tired or
being assisted by someone else, it is easy to let a workpiece slip and fall on the blade.
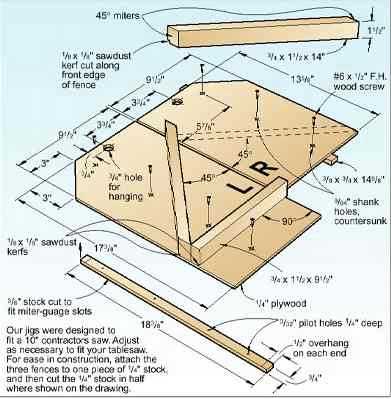
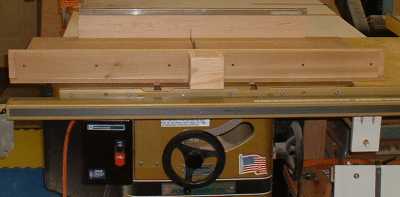
Wood Magazine published this fixed Miter sled which is quite handy for doing 45° miters. Fixed crosscut
fixtures are common in professional shops because once it's set, it's set.
 It is hard to beat a crosscut fixture / sled for making crosscuts on the table saw. Various types
of crosscut fixtures exist:
It is hard to beat a crosscut fixture / sled for making crosscuts on the table saw. Various types
of crosscut fixtures exist: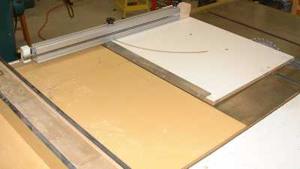


 Wood Magazine published this fixed Miter sled which is quite handy for doing 45° miters. Fixed crosscut
fixtures are common in professional shops because once it's set, it's set.
Wood Magazine published this fixed Miter sled which is quite handy for doing 45° miters. Fixed crosscut
fixtures are common in professional shops because once it's set, it's set.