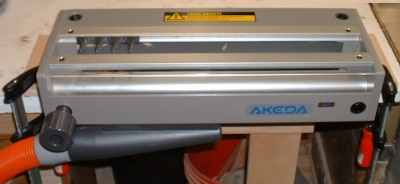
AKEDA DC-16 Dovetail Jig Review
Jack A. Loganbill
http://thewoodshop.20m.com
 If I have a woodworking addiction, it is producing dovetails. Not sure why, but I have always been fascinated with dovetails. I hand-cut dovetails using the Frank Klausz method, band saw dovetails using a variation of the Mark Duginske method, and have purchased numerous dovetail jigs including our Leigh 1258R (since upgraded to function as a D4), a Woodstock International (given to my Father), a PC4112 (sold to a woodworking colleague), a Keller 1601 (gets lots of use), and a Porter Cable 7116 Omnijig (basically a PC4112 on steroids). Since purchasing the Keller and Porter Cable 4112/7116 dovetail jigs, we use the Leigh a lot less than in the past. If I need variable-spaced dovetails, it gets the nod. Otherwise the fixed template Keller and Porter Cable 7116 Omnijig get the call, since they're simplier to use and require no test cuts.
Don't get me wrong, I like the Leigh a lot, and if you can only afford or want to master one dovetail jig, the Leigh is perhaps has been the best choice. Frankly, it has not had much competition in the category of combination jigs--that is until now. Just when you think you have seen it all, the innovative AKEDA DC-16 dovetail jig comes along. It provides the combination capability of the Leigh, meaning it produces both half-blind and through dovetails, plus it allows you to easily setup variable-spaced, symmetrical and asymmetrical dovetails. However, the AKEDA raises the bar by reducing the effort and time involved in setup and testing. I have read a few comments on the web message boards from AKEDA users that they were able to successfully machine their first dovetail in minutes. I found that such claims are indeed possible.
| Cost:
| $300 (approx.)
$500 (approx.) with the DC Accessory kit
|
| Manufacturer:
| AKEDA Jigs Incorporated
Kevan Lear, President
1489 Marine Drive
PO Box 408
West Vancouver BC, V7T 1B8
Canada
Toll free: (877)387-6544
Tel: (604)685-4840
Fax: (604)685-4817
E-Mail
|
| Technical Support
| E-mail Kevan Lear
|
| U.S. Distributor
| AKEDA products are available exclusively in the US from Woodcraft
Tel: 1.800.225.1153
|
Special thanks to Peter Collins of Woodcraft and Kevan Lear of AKEDA for providing the AKEDA DC-16 and the DC Accessory kit for our use and this review.
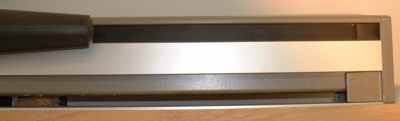
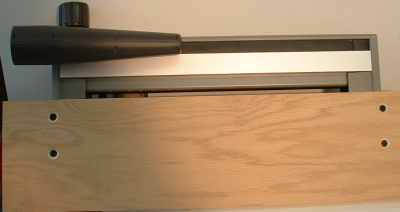
The AKEDA DC-16 is the ideal dovetail jig for those who hate setups and tinkering....it takes more time to remove the AKEDA DC-16 from its box and inventory its contents than it does to prepare it for use! All of the key components of the AKEDA, with the exception of the guide fingers, are built into the jig. For instance, the clamp bars, guide rails, and edge guides are part of the main unit and thus are not installed by the user. To prepare the AKEDA for use, perform the following steps:
- Attach a plywood base to the AKEDA. Rip and crosscut a base to the following dimensions: 3/4" x 6" x 26". Drill four 5/16" holes in the base to match four corresponding threaded holes in the bottom of the AKEDA jig. Click here for a template. This base provides a simple way to clamp the unit to a workbench, and if you position it as indicated on the template, the vertically-clamped workpieces will clear your workbench.
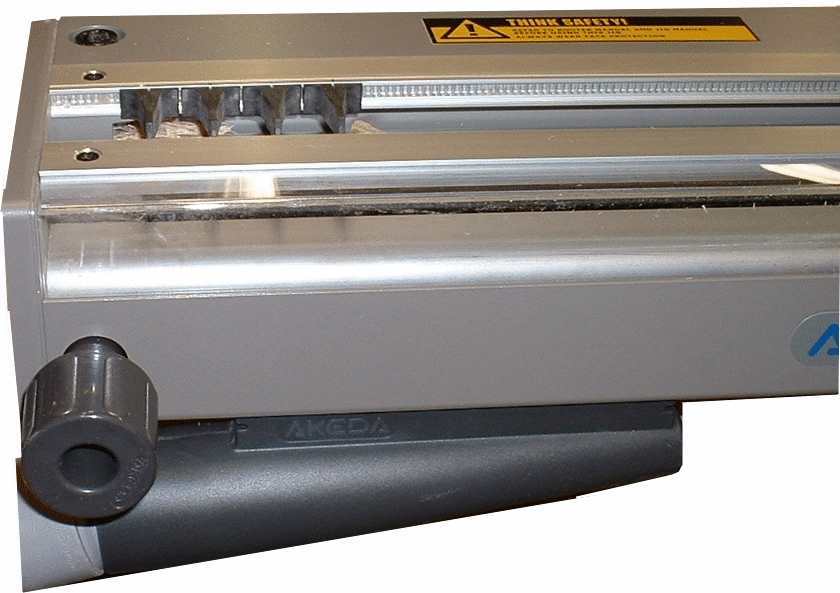
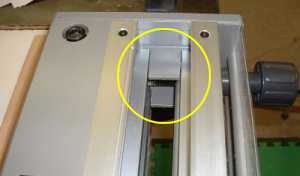
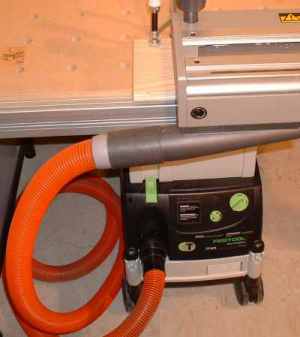
- Optionally, attach the dust (waste) collection attachment to the underside of the unit. This takes all of 5 seconds.
 Cut and attach the plenum seal to the underside of the unit. Cut it to fill the gap left after you install the waste collection nozzle. I had some reservations about cutting the seal, since I figured the waste collection nozzle was meant to slide left and right along the plenum opening. Kevan Lear had the following to say regarding my aprehensions:
The dust collector nozzle was meant to be installed in one position and left there, although you can still snap it out, slide the seal to the opposite end and re-install the nozzle at the opposite end. Further, if you cut the seal in two pieces, and you'd have a third option of relocating the nozzle in the center of the jig. Why would you want to do that? The orientation of the window depends on the work piece width, which end of the jig you're using, and the variety of wood you are machining.
For woods that virtually machine to dust, orienting the window to form a long narrow slot works extremely well. But some woods machine to large chips that sometimes jam in the slot, so in those cases I reverse the window. But if you keep the window in the position it was shipped and install the nozzle at one end of the jig, it will not pick up as well at the opposite end.
If you intend to leave the window in the position it was shipped, cut the seal in half and mount the nozzle in the center of the jig, bearing in mind the nozzle may sometimes get in the way of short vertical work pieces.
- Optionally, attach the plexiglass shutter to the inside rear of the jig if you don't plan on using the horizontal clamp (used for half-blind dovetails and special operations). The shutter further encloses the unit for improved dust collection. Since I have been using the horizontal clamp and I did want to remove and reinstall the rear guide rail, I have not installed the shutter.
- Remove the film protecting the inspection window and the nameplate. Reorient the inspection window depending on whether you're using a dust collector or not. I am using a dust collector, but I still preferred the original orientation of the window.
- Install a few tail guides (from below) and clamp a test work piece up under the tail guides, using the front clamp bar and front rail. Clamp a dead flat test work piece under the horizontal clamp, butted up against the tail piece. The uppermost face of the pin piece should be flush with the uppermost edge of the tail piece. If the surfaces are not flush, check out the technical fine tuning bulletin at the AKEDA web site.
That's all there is to it! No adjustments, no muss, no fuss. Prepare some boards and you're ready to use the jig. Most dovetail jigs require some amount of assembly, adjustment, and calibration (edge guides, templates, etc.). The AKEDA simply does not require assembly or adjustments prior to use.
Quick and Easy Initial Setup
As described above, preparing the jig for first use could not be easier.
 Fixed Edge Guides
The edge guides/stops are cast into the inner frame casting. There is nothing to adjust or test.
No "jig" Adjustments Required
I have used the AKEDA DC-16 to produce through dovetails in close to a dozen boxes/drawers. As long as you use the Akeda cutters and a precision guide bushing (more on guide bushings later), your through dovetail joints should fit perfectly. My first half-blind dovetails were almost perfect, requiring only one simple adjustment: router bit depth.
When making drawers, I typically use half-blind dovetails to join the sides to the front and through dovetails to join the sides to the back. The beauty of the AKEDA is that you can use the same tail guide finger setup to rout the tail boards for both the through and half-blind dovetails. Also, if the back is the same thickness as the sides, I don't even have to change the depth of dovetail cutter. This is a real time saver.
Box joints are a piece of cake. Unlike the Leigh or the Keller, no offset needs to be setup by the user. It is a simple matter of cutting one set of fingers using the standard tail guides and cutting the mating fingers using the half-blind pin guides. I did run into a couple of key issues that I discuss on Page Two of this review.
 Dust Collection
Due to the enclosed design of the jig, and the waste collection accessory and plenum seal, the dust collection capability of the jig is outstanding. The Festool CT22E dust extractor pulls at least 90% to 95% of the chips and dust from the unit. Very little if any debris exits the jig. I used the jig for several hours straight while video taping, and not a single piece of debris found its way to my clothes. A few chips generally remain inside the jig and I found it necessary to vacuum them out so they would not interfere with clamping work pieces in the horizontal clamp (half-blind dovetail and housed joint operations). I certainly recommend the waste collection accessory.
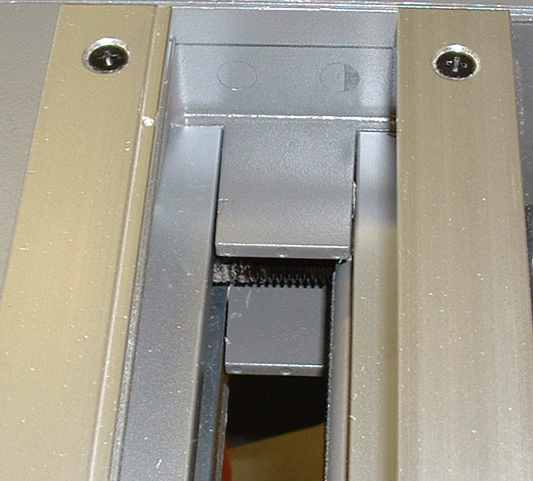
One-Handed Clamp Bars
The two clamp bars are made of heavy gauge steel and are loosened and tightened using using one hand, leaving the other hand to place the work piece against the edge stop. Each clamp bar has two sockets (left and right) that accept the loose clamping knob. You can place the clamp knob in either of the two sockets depending on your preference. Although unseen, a toothed rubber belt transfers the turns of one socket to the lead screw of the other side. The clamp bars are surfaced with a non-slip material ensuring that the work piece does not slip. Finally, the edge guides and clamp bars allow for a workpiece as short as 3".
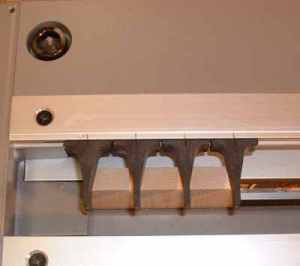
 Guide Finger Layout
The snap-in, snap-out guide fingers are ingenious. I have always been impressed with the Leigh template and guide finger system. But AKEDA has gone one step further in adjustability and ease in dovetail layout. To adjust the Leigh guide fingers you loosen each finger using a square drive screw driver, slide the fingers along the template rail to the desired position, and tighten them. It's not a big deal, but a piece of dust or a slightly bent finger can be a real nuisance in getting the fingers to lie flat and rest exactly where you want them.
With the AKEDA, you simply snap the guide fingers into the rear guide rail where you want it. The guide rail is machined with notches, spaced exactly 1/8" apart. The guide fingers have two corresponding nubs that align with and fit into the guide rail notches. Furthermore, each guide finger is manufactured with grooves and tabs that work with the guide rail to hold the guide in place. A pencil ledge is provided along the rear guide rail that allows you to easily mark the position of the pin and corresponding tail guide fingers. Each finger is machined with a center mark to ensure that you can line up respective guide fingers with precision.
I find it easier to setup mirror image asymmetrical layouts with the AKEDA than the Leigh, since the tail/pin guides snap in at 1/8" increments. I don't have to measure, mark boards, or fuss around to setup the "mirror" image layout.
I have read reviews where AKEDA users have snapped (broken) the guide fingers trying to snap them in and out--I don't get it! It could not be easier, and I have large, insensitive hands! Just don't try to force them! If the guide finger does not readily snap in, chances are its rear notches have not indexed with the corresponding notches in the guide rail.
I asked Kevan Lear regarding the possible wear and tear on the guide fingers, this is his response:
Almost a year of engineering, prototype tooling, research, and experimentation went into the guide fingers! They are carbon fiber with a complex mix of resins. We did wear tests. Apart from the shaving down to size that takes place the first time they are installed, there is a "wear in" process that takes place during the first 200 insertions. After that, we tested to 1,000 insertions with no measurable deterioration. We are also making some invisible changes that will further extend guide finger life, and we are experimenting with different fibers and resins. Also, when the snaps actually flex, they never exceed the material's ability to return to its original shape.
 The Guide Rails
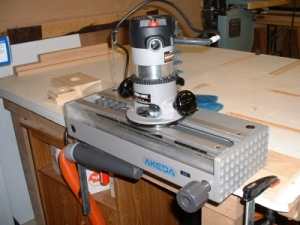
The router rides on the extruded aluminum guide rails, not the guide fingers. The guide rails provide a very stable surface for the router base, in fact when finished with a cut, I slide the router to the opposite side of the jig and let it spin down unattended as I remove the work piece.
The Jig is Completely Enclosed
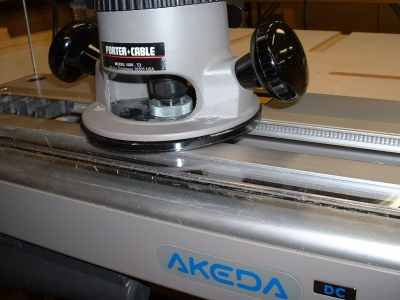
The work piece, cutters, clamp bars, and debris are enclosed in the jig. This is the first dovetail jig that I feel comfortable using while sitting down. With my series of back problems, this is a real boon. I can stand. I can sit. A side note: I purchased and have been using Pat Warner's clear subbases on my PC 690 and Bosch 1617 routers used with our dovetail jigs. The clear base provides a good view of the cutter and guide fingers. This is especially helpful in conjunction with the AKEDA and its enclosed design.
Overall Look and Feel
Not a key purchasing point but the jig does have a great look and feel to it. It is rock solid, built of quality castings and aluminum extrusions. Though priced perhaps for the home shop, I would guess this jig will survive just fine in a professional shop.
Easy to follow user's guide
The user's guide is laid out very well, though its format (size) is unstandard to say the least, it works well in the shop (though I made a photo copy for shop use). Do download and print the user manual supplements available from the AKEDA Jigs Web Site. They include usage instructions for the half-blind stops, housing joint template, etc.
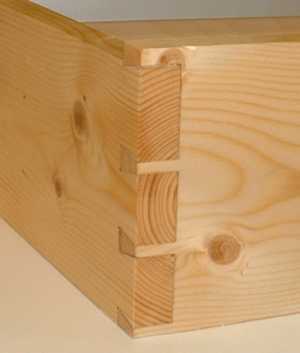
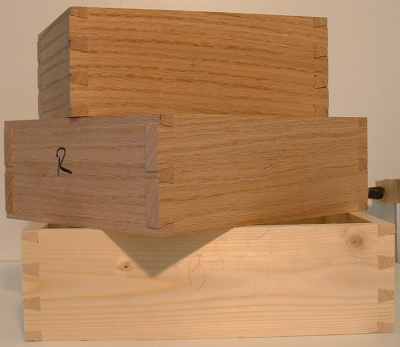
Dovetail Geometry
I like the geometry / asethetics of the AKEDA-produced dovetails.
The angles and widths are a little more attractive (to my eye) than the Keller and PC7116 dovetails. I also like the 1" (minimum) spacing. The Leigh can accommodate 1" spacing, but the Keller 1601 spacing is a little wider (1-1/8").
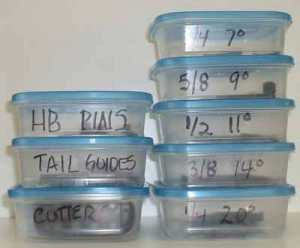
AKEDA provides more control over the dovetail geometry by providing a range of dovetail bits associated with wood thicknesses:
- 3/4" 7° bit is used for 3/4 material
- 5/8" 9° bit is used for 5/8" material
- 1/2" 11° bit is used for 1/2" material
- and so forth...
TD Pics
HB Pics
The Leigh, for instance, offers a range of dovetail cutters for through dovetails, but only one angle (8°).
|
|
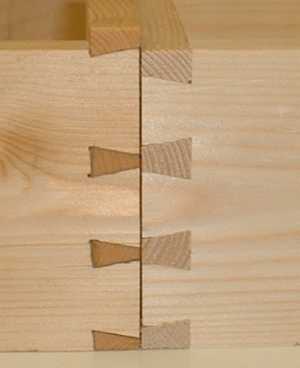
Kevan Lear suggested I try a trick to produce pins that look even slimmer, more like handcrafted dovetails. To do so, layout and rout the pins. Move the pin guides over 1/8" (one increment on the guide rail) and rout them again.
The tail guides won't work with the slimmer pins, so you must cut the tails by hand. Mark the tail boards using the pin boards as the template as you would for any hand cut dovetails. You can cut the tails using a bandsaw or handsaw. I made a simple 11° jig to cut the vertical lines for the tails on the bandsaw, and then chopped out the waste using a chisel.
Click on the picture to the right to see another view of the same joint.
|
|
I originally reported to Kevan Lear of AKEDA that I had not found a single serious fault in the jig. Sure, there is always something, but nothing of importance. So the following are mainly annoyances, rather than things I don't like. Perhaps they'll strike a chord with you, or you'll think I'm nuts--just trying to call'em as I see'em!
Tear-out
You really have to watch the exit cut on through dovetail tail pieces, since the tail pieces face away from the operator. To prevent tear-out:
- Orient the tail pieces in the jig so that the face is towards the operator. This contradicts the operating procedure described in the guide, but it works for me.
- Mount a pine backer board in the horizontal clamp, to back up cutting tails and through dovetail pins.
- Move the router slowly as you exit the back.
- Use sharp cutters.
The following is a suggestion from a woodworker regarding reducing tear out, sent to me through Kevan Lear of AKEDA...
Take two tail guides. Using a fine tooth hacksaw, very carefully cut the right leg off one tail guide and the left leg off the other, taking care to keep clear of the snaps that engage the guide rail. Install these modified tail guides at the extreme L.H. and R.H. ends of your guide finger layout when you're cutting tail pieces. The missing leg gives you more freedom to rout around the edges of the tail piece when you're cutting out the sockets for the half pins, and will result in less tear out. I've tried it myself and it works very well.
Regards,
Kevan
Tear-out is less of a problem, at least for the face, of through dovetail pin boards since they face towards the operator. Tear-out is non-existent in half-blind pin boards.
 Holey Moley there are a lot of parts!
Okay, I'm grasping for negatives, but when I first inventoried the contents of the two AKEDA boxes I received from Woodcraft, I shook my head in disbelief--geez Louise there's a lot of parts.
Inherent to its innovative and versatile design, the AKEDA will force you to organize and keep track of several sets of tail and pin guide fingers, cutters, and so forth. I organized everything into a set of individual, clear Ziploc brand plastic boxes. It works for me. It may not work for a busy professional shop. I'm afraid that if you have multiple employees using the jig, before long guides and cutters will be missing, and not through theft, simply due to misplacing them.
Oh, and don't let the wife run the Festool or Fein vacuum anywhere near your AKEDA workbench.......Perhaps the first project an AKEDA owner should build is a little organizer.
Rout half-blind dovetails in two steps
Typical of combination dovetail jigs, you cut the tail and pin boards separately for both through and half-blind dovetails. It's not a big deal, but if you're looking for maximum production output, a dedicated half-blind dovetail jig like the PC 5116/7116 will produce drawers quicker than the AKEDA (or Leigh). Also, you tend to get less tear-out with a dedicated half-blind jig, since the front/back acts as a backer board to the side pieces (tails). With that said, unlike dedicated half-blind jigs, the AKEDA (and Leigh) allow you to adjust the dovetail layout to fit the drawer size, and not visa versa and offer variable-spaced, symmetrical, or asymmetrical layouts.
Kevan Lear's response....
You can in fact cut variable-spaced half-blind dovetails in a single pass, IF the work piece width is less than half the width capacity of the jig. Simply make identical pin and tail layouts at opposite ends of the jig, clamp the pin piece at, say, the LH end of the jig and the tail piece at the RH end, then machine the pin piece, and continue on to machine the tail piece--without stopping. It's just as fast as a dedicated half blind template jig, and faster than the [place name here]!
Tail Guide Spacers
The other thing I don't like about cutting half-blind dovetails with the Leigh and AKEDA, is you need to come up with spacers to fill the no-cut space between the tail guide fingers. AKEDA provides an optional housed joint/sliding dovetail template, made of plastic, that you can cut into spacers, but if you're doing lots of different sized, variable-spaced dovetailed drawers, cutting the spacers is a bit of a drag. Kevan Lear suggests that you really do not need the spacers. Instead, when exiting the cut for a tail, run the router along the front guide rail, until you enter the next tail guide finger. This does work, as long as you know where the next finger guide is (which can be difficult depending on whether or not you can see through your router base, standing or sitting, and so forth). Kevan again suggests that you place a pencil mark for each tail guide on the front guide rail to faciliate finding the tail guides. I have tested this and it does work, but if you have lots of drawers to rout, probably your best bet is to bite the bullet and fill the space.
Kevan Lear's response....
I always use the front guide rail and dispense with the tail guide spacers, ....I have used the jig so much, I can do it by eye. ....someone else suggested making marks on the front of the jig, in line with the tail guides, where you can see them while you're routing. I've tried it and it works well.
I keep knocking the clamp knob off the unit!
Classified under the category of complaining about being hung with a new rope, I constantly knock the clamp bar knob off the unit. It rolls about 3 meters per/second. (Thanks to Festool, I'm now measuring things in meters.)
Picky Guide Bush Requirements
I found that the guide bushing you use has a lot to do with the quality of the joint. If your bushing is too small, your joints will be loose. The diameter of the guide bushing is not as critical on the Leigh since you adjust the fit of the joint by sliding the pin template fore or aft. Since the AKEDA does not offer such an adjustment, your best bet is to ensure you have a precise (diameter) guide bush. Otherwise, you must use the AKEDA undersize/oversize straight router bit when cutting the pins to tighten/loosen the fit. Note that AKEDA offers a precise guide bushing for use with the AKEDA DC-16.
Why not offer a 24" Model?
I have received a dozen emails wondering about the width limitation of the AKEDA DC-16. Frankly, for most work, a width of 16" is more than sufficient. The AKEDA was originally designed as a drawer-making dovetail jig, thus the 16" width is more than adequate. However, case/chest construction could require wider widths, but there are ways around the size limitation (i.e., dovetail the carcase in two pieces, then join them). Plus, if you do lots of cases/chests wider than 16", consider a Keller. With that said, I don't see why AKEDA does not offer a stretched AKEDA DC-24 for those that think bigger is better.
I first reported about this jig several years ago and said that if it could deliver on half of its promises, it would be a welcome addition to any shop. I'm not really keeping track, but I believe that Kevan Lear and company indeed met all of their lofty and seemingly outlandish promises (did you ridicule the artist's rendereing?). The jig produces through and half-blind dovetails without any adjustment whatsoever to the jig. Period, end of paragraph. The dust collection works very well. I added the Leigh dust extraction attachment to one of our routers, and it works, but the AKEDA system works better and is much more convenient. The jig flat out works as advertised. My first couple of boxes came out perfectly. My first half-blind dovetail drawer was close to perfection, requiring only a slight adjustment of the router depth. The only problem I ran into involved a slightly undersized guide bushing, and I got around that by careful routing (described on the following page).
The bottom line is this. The AKEDA produces the same wide variety of dovetails as the Leigh and does so with less setup and hassle. By the way, don't think I am cutting down the Keller, PC Omnijig, and Leigh jigs. I use them, will continue to use them (well, probably continue to use them). They are all excellent jigs that have strong market share for a reason: they work.
However, the AKEDA seems to have taken the best that these jigs have to offer and added a few additional features that attract a range of woodworkers (i.e., built-in dust collection, ease in layout, perfect joints without test cuts, and so forth). If you get a chance to see the AKEDA in person (check out your local Woodcraft store, they carry other dovetail jigs as well), I think you'll be equally amazed with the look, feel, and operation of the AKEDA. If you like, I would be happy to demo the unit, side-by-side with the Leigh, Keller, and PC 7116 Omnijig. Just drop me a line. We also plan to have some videos available very soon, demonstrating the AKEDA, and comparing it and its results to the Leigh, Keller, and PC Omnijig. Stay Tuned!
Laying out and cutting through dovetails using the AKEDA is about as easy as it gets. Here is the basic procedure:
-
Prepare your stock. Make sure it's flat and the ends are square. Though not essential, it makes sense to rip your parts to increments of 1/8" to facilitate the 1/8" increment of the guide rails.
-
 Lay out your dovetails: (Click image to view layout slide show)
-
Place a work piece in the jig.
-
Choose a set of TD guide fingers by matching the guide finger angle with the dovetail cutter you plan touse. For example, if you choose the 1/2" 11° cutter, you must use the 11° pin guides.
-
Lay out the dovetails using the selected pin guide fingers. Place the first finger 1/8" away from the reference punch mark on the guide rail to establish the half-pin. I generally set the other half-pin next. Then, lay out the remaining guides symetrically or asymmetrically, based on the project, appearance,.....
-
Once the layout is set, place a pencil mark on the pencil ledge to mark the center line of each guide finger. Each guide has a center line to faciliate this.
-
Remove the work piece from the jig. Replace the pin guide fingers with the tail guides, aligning the center of each tail guide to your pencil marks. To ensure the guides are secure for routing, always insert the guides from the bottom, tilting/snapping them up into place.
-
Insert your tail work piece facing away from the operator (towards the back of the jig) and firmly up against the guide fingers and left/right edge stop. Ensure that the work piece end is flat against all of the guide fingers. If the board is not square, it will be impossible to place the board edge against the edge stop and its end flat across all of the guide fingers.
-
Insert a precise 7/16" (.437) guide bushing in your router.
-
Insert the desired dovetail bit in your router. Click here for the AKEDA image of the cutters. Set the cutter depth to the thickness of the guide rail (1/2" or 9/16" depending on your model) plus the thickness of the mating work piece plus 1/64". For example, if you have the 1/2" guide rails and your pin board is 1/2" thick, set the cutter depth to 1-1/64". This adjustment does not affect joint fit, but rather dictates how far the tails will protrude past the pin board.
-
Cut the tails. The guide says to place the face of the tail boards facing away from the operator, towards the jig. This ensures correct tail to pin board orientation. However, you'll tend to get more tearout on the exit cut, which is the face of your project. To avoid tearout, place a backer board under the horizontal clamp, behind the tail board.
If there is more than a couple of thousandths of an inch clearance between the guide bush and the space between the fork of the guide, I run the bush along the left side of the fork, otherwise the joints tend to be on the loose side. If you don't want to bother thinking about it, and your guide bush is undersize, use the undersized straight bit when cutting the pins.
-
Once the tails are cut, replace the tail guides with the TD pin guides selected earlier, aligning the center mark of the guide to the pencil marks. Again, insert the guides from the bottom, snapping them up into place.
-
Insert your first pin board in the jig, face facing towards the operator.
-
Insert the AKEDA straight cutter in the router and set the cutter depth to the thickness of the guide rail (1/2" or 9/16" depending on your model) plus the thickness of the mating work piece plus 1/64". For example, if you have the 1/2" guide rails and your tail board is 1/2" thick, set the cutter depth to 1-1/64". This adjustment does not affect joint fit, but rather dictates how far the pins will protrude past the tail board.
-
Cut the pins. A shallow right-to-left climb cut across the face will minimize tearout. If your joints are loose, cut the pins with the undersize bit. If your joints are too tight, cut the pins using the oversize straight bit.
That's all there is to it. In producing our AKEDA videos, I got to the point where I could setup and machine all four sides of a box in 10 minutes. With one router. Speaking of videos, here is the first draft of our AKEDA Through Dovetail video in Real Media format (Requires Realplayer for Windows or Other Platforms):
 Cutting Half-Blind dovetails using the AKEDA is also very simple. The only step I don't like is coming up with filler pieces to fit between widely spaced tail guides. The supplemental manual suggests that you can cut spacers from the plastic sliding dovetail/housed joint template, which is convenient, but perhaps somewhat expensive ($10 per strip) for the long run.
Kevan Lear's response regarding tail guide spacers:
I always use the front guide rail and dispense with the tail guide spacers, ....I have used the jig so much, I can do it by eye. ....someone else suggested making marks on the front of the jig, in line with the tail guides, where you can see them while you're routing. I've tried it and it works well.
I have followed Kevan's procedure and it works. However, if your machining lots of drawers, I recommend that you bite the bullet and cut the spacers.
I typically use half-blind dovetails to join the sides to the front, and through dovetails to join the sides to the back. The beauty of the AKEDA is that you can use the same tail setup for the through and half-blind dovetails. Also, the appearance of the AKEDA-produced half-blind dovetails are more attractive than those produced in our Omnijig.
The process for cutting half-blind dovetails is as follows:
-
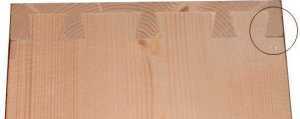 Prepare your stock. I use 3/4" fronts and 1/2" sides and backs, and generally use through dovetails to join the back to the sides. It is essential that your workpieces are flat and square. I found that if the pin-tail socket board is the least bit warped/cupped, the depth of cut will be inconsistent. The joint will fit together fine, but you'll end up with a gap between the end of the tails and the tail socket as shown to the right. Also, though not essential, it makes sense to rip your parts to increments of 1/8" to facilitate the 1/8" increment of the guide rails.
-
Lay out your dovetails as described for the through dovetails. The tails are cut using the common tail guide fingers. The pins are cut using the half-blind pin guide fingers. You cut both the tails and pins using the dovetail cutter. Fit is determined by cutter depth, however other factors can affect the joint fit. These factors include: loose guide bushing, non-concentric cut (caused by dirty collet, bent cutter shaft, worn router bearings, etc.), and incorrect guide bush or cutter diameter. Select the specific AKEDA dovetail cutter as described for the through dovetails. Click here for the AKEDA image of the cutters.
-
For drawers, I layout the dovetail spacing using the side (tail) board as the guide. Use the HB pin guides (there is only one set, regardless of cutter selected) to lay out the dovetails. Place the first finger 1/8" away from the reference punch mark on the guide rail to establish the half-pin. I generally set the other half-pin next. Then, lay out the remaining guides symetrically or asymmetrically, based on the project, appearance,.....
-
Once the layout is set, place a pencil mark on the pencil ledge to mark the center line of each finger.
-
Replace the pin guide fingers with the tail guides, aligning the center of each tail guide to your pencil marks. If you prefer to fill the gaps between guide fingers with spacers, do so.
-
Insert a precise 7/16" (.437) guide bushing in your router.
-
Insert the dovetail bit in your router and set its depth. Unlike through dovetails, the tighteness of fit for half-blind dovetails is determined by the depth of the router bit. This may take some trial and error, however, the following table will get you very close:
| Router Bit
|
| Depth
1/2" Rails
| Depth
9/16" Rails
|
| 3/4" 7°
|
| 1-1/4"
| 1-5/16"
|
| 5/8" 9°
|
| 1-1/8"
| 1-3/16"
|
| 1/2" 11°
|
| 1"
| 1-1/16"
|
| 3/8" 14°
|
| 7/8"
| 15/16"
|
| 1/4" 20°
|
| 3/4
| 13/16"
|
-
Cut the tails. Place the tail board with its face facing away from the operator, towards the jig. This ensures correct tail to pin board orientation. You clamp the HB tail board using the front clamp, but against the front clamp rail, not the rear rail as you would do with through dovetails.
-
 The first time through, cut one set of tails and on set of pins and check the fit. Adjust the depth of the router bit as necessary. I measure the gap with a feeler gauge and adjust the depth of the router to half of that. Works for me. (Others say to adjust the router to the full amount of the gap.) If the fit is too loose, adjust your router to take a slightly deeper cut. If the fit is too tight, adjust your router for a shallower cut. If you have trouble getting a satisfactory fit, make sure you're using an AKEDA dovetail cutter and that you started with the settings in the DC-16 manual, or the table above.
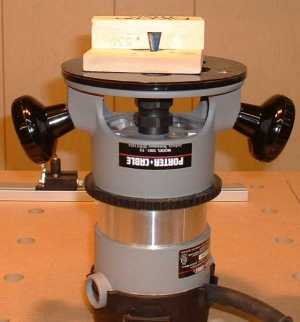
Since I do not intend to dedicate a router to rout half-blind dovetails with the AKEDA jig, I produced a simple height gauge block as shown in the picture to the right.
- Once the tails are cut, remove the tail guides and place the left-hand (assuming you're working on the left-hand side) stop pin guide in position for the left-hand half-pins.
-
Adjust the pin stop guides. Use the pin stop guides to ensure that the sides of your drawers are uniformly inset into the tail sockets. I adjust the stops so that the sides are inset by slightly less than 1/64". After trying several procedures, I now use this procedure to adjust the stop guides:
- Place the stop guides in the rear guide rail at the two half-pin positions. Ensure that they are oriented so that the index marks are facing outward. If not, you have the left guide in the right-hand position (and visa versa) and risk running the dovetail cutter into the stop. (By the way, file off the casting flash from the stops to ensure they contact the board correctly.)
Click Here to See Correct Layout Click Here to See Incorrect Layout
- Use a pencil to mark the thickness of the side board across one end of the pin-tail socket board.
- Slide the marked end of the tail socket board under the rear horizontal clamp. Extend the board so that your pencil line aligns with the front edge of the rear guide rail.
- Loosen the stop blocks and position them so they contact the end of the tail socket board. Tighten the stops.
-
Do not change the depth of the dovetail cutter. The same dovetail bit and depth of cut are used to rout both the tail boards and the pin-tail socket boards.
-
Cut the pins (tail sockets). Since your cutting into edge grain when cutting the tail sockets, move the router slowly. Do not make the right-to-left climb cut, as you could lose control of the router.
Here is the first draft of our AKEDA Half-Blind Dovetail video in Real Media format (Requires Realplayer for Windows or Other Platforms):
Routing box joints with the AKEDA is very easy to do. My first set of box joints worked perfectly. Routing box joints on the AKEDA is easier than on other dovetail jigs such as the Leigh because you don't have to worry about offsetting mating boards. You place all boards against the end stop, and the standard tail and half-blind pin guide fingers do the rest. Piece of cake really. However, I did run into some problems, and thus have included a few cautions in the text that you must consider. Here is the process I use to cut "uneven" box joints using the AKEDA:
- Prepare and size your boards. Again make sure they're flat and square. In regards to sizing. This could take volumes so let me distill it to what worked best for me taking efficency and appearance into account. Given that I did not want to move guide fingers during the operation, I decided go with uneven (two widths of) fingers. The "tail" fingers are approximately 5/8" wide, and the corresponding "pin" fingers are approximately 3/8" wide. Prior to actually routing them, I thought they would not look right, but in reality, they look fine. Okay, given that, I set the first guide finger 1/8" from the punch reference point, and positioned the remaining guides shoulder-to-shoulder so to speak.
Caution #1 -- I quickly found that I had a problem. I had not sized the width of the boards (height of the box) to match the minimum spacing of guides. To get the fingers to start and end correctly, I found I had to size the width of the boards in one inch increments, beginning with 1.275" (approx. 1-9/32"). Thus, the sequence of widths would be 1-9/32", 2-9/32", 3-9/32", 4-9/32", and so on. Again, this assumes you are using the standard 3/8" pins, 5/8" tails, and the 1/8" offset from the reference punch--all factors that I decided were best for my eyes and patience with a jig.
AKEDA has produced a simple to use Excel spreadsheet for determining the width of boards for uneven box joints. The board widths it states for uneven box joints, using the 1/8" spacing away from the reference punch, are slightly different than mine (2.25, 3.25, 4.25, and so on). Click Here to access the Box Joint Spreadsheet.
- Place a 7/16" guide bushing in your router. Caution #2 -- Make sure the ID of your guide bushing has adequate clearance for the AKEDA box joint cutter. The box joint cutter OD is .350". The ID of the Leigh precision guide bushing is approximately .355. This is not enough clearance. I know. During my second box, I hit a nasty area of wood that caused all heck to break loose. Probably due to insufficient clearance, vibration, whatever, the bit hit the bushing, and the bushing exploded, expanding and breaking the bushing's walls. The work piece and jig were fine, but the $15 guide bush and my nerves were shot.
After collecting my thoughts, I inserted a second Leigh guide bushing and noticed that the cutter hit it as I rotated the bit. Dang! I measured its ID and it measured approximately .353-.354, but because the guide bush was not perfectly concentric it hit. I measured the ID of my three Porter Cable (PC # 42027) guide bushings, and their IDs (11/32") were too small to work with the box joint bit. Double Dang!! My last option was to use our Bosch 1617 router with its RA1105 7/16" adapter. Its ID was marginally satisfactory. By the way, Bosch recommends a minimum of 1/16" (.060") clearance, which of course I did not have with the AKEDA box joint.
However, while cutting a similar nasty area later in the day, I ran into another problem. Caution #3 -- The Bosch RA1105 guide bushing extends 1/8" (.125") from the router's subbase. This length is marginally acceptable, and too short for my comfort. Furthermore, you can subtract .010 -.020" from that length, since the router actually rides on the AKEDA guide rails, and the guide fingers are approximately .015" lower than the guide rails. Sure enough, later I hit another nasty area, causing the router to raised off the guide rail, ever so slightly (mandatory excuses: I had been using the AKEDA for about 6-7 hours straight, I was tired, I wasn't paying as much attention as I should have, I was a bit woozy due to my back drugs, etc.) and with the short guide no longer contacting the finger, I moved the router into one of the guide fingers. My first accident with the AKEDA after 40-60 hours of use. The bottom line, make sure the AKEDA box joint bit clears your guide bushing.
Kevan Lear indicates that the AKEDA 7/16" guide bushing has an ID of .385", which should provide adequate clearance for the AKEDA box joint bit.
- Place the AKEDA box joint cutter in the router and set it to a depth of your guide rails + mating side + 1/64". Again, make sure the bit clears the ID of the guide bushing with room to spare.
- For my tastes, I cut the front/backs using the tail guides (use the standard tail guides). Clamp the work piece using the front clamp against the rear clamp bar, with the edge of the workpiece against the edge stop/fence. I cut the "tails" with the work piece facing in, away from the operator. I also gang cut two 1/2" thick work pieces at one time with good success. To avoid tearout/blowout, use a backer board, and do a climb cut on the pin faces.
- I cut the box sides using the half-blind pin guides. I cut the "pins" with the work piece facing out, towards the operator. Technically you can gang cut the pins as well, but in my cases the thickness of the pieces caused the combination package to extend to far towards the rounded portion of the guide fingers, leaving a slight round over on the pins. To avoid tearout/blowout, use a backer board, and do a climb cut on the pin faces.
And that is all there is to it. Given the cautions, you should have no problems cutting box joints using the AKEDA. I cut several boxes in less than 1/2 hour. I have not used the equal width box joints method described in the AKEDA user manual. Furthermore, I find the table saw method for cutting box joints is a bit faster and cleaner, but routing box joints on the AKEDA definitely works and does not require any special setup. If you prefer to rout the more traditional "even" fingers, follow the instructions in the AKEDA User Manual.
When routing workpieces, always insert the AKEDA guides from the bottom, tilting them up to snap them in place. This will ensure that they are secure. When setting up the joint layout, I typically insert a workpiece and snap the guides from the top (since the workpiece would prevent inserting the guides from the bottom). However, prior to routing, always insert the guides from the bottom.
Assuming you're using a precision 7/16" guide bush, AKEDA dovetail and straight bits, and the correct pin guides (the angle of the pin guide must match the selected dovetail bit), your through dovetail joints should come out perfect every time. (Remember, the fit of half-blind dovetails is controlled by the depth of cut of the router bit.)
If your through dovetail joints are too loose (probably caused by an undersized guide bushing), rout the pins using the undersized AKEDA straight bit; if they're too tight, rout the pins using the AKEDA oversize bit.
If your through dovetail joints are very loose and you have tried the above, the problem may be associated with router or cutter runout. I experienced this first hand and left me puzzled for awhile. Somehow I managed to "bend" the shaft of the AKEDA straight cutter. The cutter runout measured about .008" at the cutter tips, which caused a gap in my tail/tail sockets of .012".
If your router bit is not centered within the guide bush, the joint fit should be okay, but the mating top/bottom edges won't line up perfectly. You'll have to plane or sand the top and bottom edges to make them match. Leigh, as per phone conversations with their technical staff, assume that it is a matter of fact that you will want to plane the drawer (for example) to match the drawer opening. Since most of my drawer making is for less than fine furniture, I purposely mill the drawer sides to be 1" less than the height of the opening. Consequently, planing to make up for a deficiency in a guide bushing setup is an added excercise I would rather not perform.
Half-blind dovetail fit is determined by cutter depth, however other factors can affect the joint fit. These factors include: loose guide bushing, non-concentric cut (caused by dirty collet, bent cutter shaft, worn router bearings, etc.), incorrect guide bush or cutter diameter. Refer to the Half-blind dovetail fit document available from the AKEDA Tech Manual Updates web page.
When routing half-blind dovetails, if you acheive the right fit, yet there is a gap between the end of the tails and inside of the tail socket, chances are your tail socket-pin board is warped or cupped. The jig will not flatten out warped/cupped boards enough to produce an even depth of cut. Consequently, the tail to tail socket fit may be right on, but the depth of the tails and the depth of the sockets will not match, thus you'll see this gap. If your workpieces are dead flat, and you still see a gap between the end of the tails/tail sockets, check out the Fine Tuning Information at the AKEDA web site.
Since I wrote this original review I have spent dozens of hours working at the AKEDA and Leigh dovetail jigs. I have experimented with a variety of subbases, guide bushings, router bits, and so forth. With the idea that perhaps some of this experimentation may save the reader from a few frustrating hours, here are my additional findings:
- Don't work in the cold! It has been pretty frigid in the shop the past few weeks. I turn the furnace off in the evening and fire it up when I return. The first few hours the shop remains pretty cold & damp. By the end of the day, the shop is toasty and dry. I found from day-to-day and from day-to-evening joints machined in either jig were coming out tight, only to be loose a few hours later. It was driving me nuts. Then standing in the local Woodcraft store talking with one of their fine employees it hit me that the wood was expanding/shrinking with the swings of the temperature and humidity of the shop. Dang, I wasted a lot of time figuring this one out!
- Mount a Pat Warner Clear Offset subbase to your router. I was getting a very consistent gap at the tail/tail socket routed at the far end of the jig. Everytime, both jigs. Kevan Lear suggested that I was tilting the router while routing the tail/sockets at the far end of the jig. Poppycock I thought. I tried a Pat Warner offset base, carefully centered the base, guide bushing, and router bit--no gap! Indeed the offset base provided much more control, keeping the base planted on the guide fingers/guide rail.
- Carefully center the base, the guide bushing, and the router bit. I do this by lowering the dovetail bit into the guide bush with the base loose until the bit slightly touches the guide bushing. Then I carefully move the base until the bit is as close to centered as possible. Tighten the base and test it. Works for me everytime. This may not affect the fit, but it will certainly improve matching the top/bottom edges of matching work pieces.
- I prefer 8mm shank router bits for use with dovetail jigs. The Leigh 5/16" straight bit works with the AKEDA. Since it is a bit undersized relative to the AKEDA straight bit, it produces a tight to very tight joint.
- I generally use the undersize AKEDA bit for 1/2" 11 degree setups. Otherwise the joints end up a bit loose for my liking. I find the 3/4 7 degree setup to be less finicky, meaning either straight bit works perfectly well.
- Both the Leigh and AKEDA are excellent jigs. I have spent dozens of hours between them, using both, back-to-back, side-by-side. I stand by my original opinion that the AKEDA is simply the easiest of the two jigs to use, especially for those who don't use the jig everyday, every week.....The best bet is to try them before you buy them.
If you're planning to purchase the AKEDA, I strongly suggest that you consider purchasing the DC Accessories package. The package runs about $200, making the full purchase price of the AKEDA approximately $500. In the long run, to take full advantage of the design of the AKEDA DC-16, you will want the full set of cutters and finger guides, and the waste collection components. All of these components are included in the DC Accessories package.
The AKEDA and Festool reviews continually generate the most questions. I wished I had collected all of the AKEDA questions, but here are the most recent.
Comment
Jack, let me first compliment you on your web review of the Akeda. Well done! Just a note, you might like to update this info Whiteside is now making Akeda bits, available at Woodcraft. The bits are USA made, C4 carbide, good stuff!
Take Care!
Randy
Thanks Randy. Here is a table describing the Woodcraft Whiteside / AKEDA bits:
|
Description
|
Product Number
| Price
|
| 7º Dovetail Bit
| 144972
| $27.99
|
| 9º Dovetail Bit
| 144973
| $27.99
|
| 11º Dovetail Bit
| 144974
| $27.99
|
| 14º Dovetail Bit
| 144975
| $27.99
|
| 20º Dovetail Bit
| 144976
| $27.99
|
| Standard Straight Bit (.315")
| 144977
| $19.99
|
| Undersized Straight Bit (.311")
| 144978
| $19.99
|
| Oversized Straight Bit (.319")
| 144979
| $19.99
|
| Box Joint Bit (.350")
| 144980
| $22.99
|
| Nine Piece Bit Set
| 144981
| $179.99
|
Question
What is the maximum thickness of stock that can be used with the AKEDA? I believe Leigh handles thicknesses up to 1-1/2".
Answer
| Work Piece Width
| Minimum: 1-1/4" (30mm)
Maximum: 16” (400mm)
|
| Work Piece Length Vertical Minimum:
| 3-1/8" (80mm)
|
| Horizontal Minimum:
| 3-1/2” (90mm)
|
| Work Piece Thickness
| TD pin piece: 1/4" - 3/4” (6,5mm - 19mm)
TD tail piece: 1/4” - 1” (6,5mm - 25mm)
HBD pin piece: 3/8” - 1” (9,5mm - 25mm)
HBD tail piece: 1/4” - 1” (6,5mm - 25mm)
|
The Leigh might handle 1-1/2" thick workpieces for some operations, but I thought the maximums were 1" to 1-1/4". I have not used it for workpieces thicker than 5/4s. However, I find the Akeda handles a wider range of workpieces than the Leigh, especially on the smaller end of the scale. Since I make lots of boxes, this is an important consideration for me.
Question
The AKEDA booklet that the jig will only work with Akeda (or Akeda approved) cutters. I've since been told that there is no such thing as Akeda approved cutters. It is their cutters or nothing....unless you have them custom made. Is this true?
Answer
The AKEDA geometry requires cutters that are uncommon, non-standard diameters and angles, thus you must use AKEDA cutters with the AKEDA DC-16. To my knowledge, the router bit manufacturers are not currently producing AKEDA cutters, but I am sure that will change. I have used the Leigh 5/16 straight bit for TDs, and it works, though the joint is a bit on the tight side. In other words, if the cutter is of the right geometry (diameter/angle), it will work with the AKEDA. By the way, AKEDA cutters are reasonably priced and available currently through Woodcraft. Consequently, having a second source is not a big deal for me.
 Guide bushings (also known as collars or a guide bush) are extremely versatile and indispensible for many router operations. However, I have learned the hard way that your standard fare bushings are poorly machined. Their tolerances are so wide that the bushing can be as much as .030" out-of-center. For many template operations, you may not notice the out-of-center condition. However, for dovetail routing, an out-of-center bushing can cause all kinds of heartache:
-
 If your dovetail bit is not centered in the guide bushing, you will find it almost impossible to match the top/bottom edges of all four components of a drawer, box, or carcass. Period. The dovetails may go together perfectly, but you'll always have a uneven top/bottom edge. You'll notice that the demo guys never rout an entire drawer or box. They simply do one corner. Sometime ask them to rout all four components and assemble them. I bet, as has been my experience, the finished product will exhibit this problem. (The Keller booth does not have this problem since their bits rely on bearings, not guide bushings.)
-
If your dovetail bit is not centered in the guide bushing and you're not careful with your router technique (keeping the router faced in the exact same direction through all cuts), you'll end with poorly fitting joints.
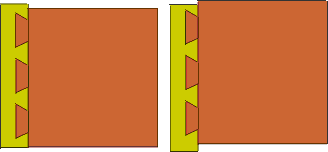
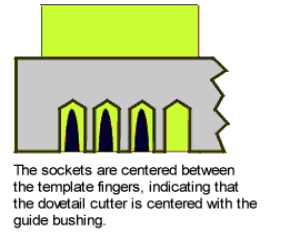 To determine whether your bit is centered in the guide bushing, simply lower the bit into the bushing, rotate the bit, and look to see whether the tips of the bit are centered within the bushing for an entire rotation. Or, better yet, make a test cut with your dovetail jig. If the cut is centered between the template fingers, you're good.
Some router bushing systems or router plates allow you to shift the bushing or plate to reduce the out-of-center problem. If not, you might lessen the problem if you rotate the bushing so that the greatest deviation faces away from the jig (towards the operator). Then, make sure you keep the router facing the same direction as you rout the dovetails.
The best bet is to purchase the precisely machined template guide bushings from Leigh or AKEDA.
Is there a best dovetail jig? In my humble opinion, I say No. Just like it is impossible to say there is one best automobile, I cannot categorize one dovetail jig as being the best. I recently read an advertisment where Scott Phillips has designated the AKEDA as the hands down best jig available. It's good. Very good. But I do not agree with anyone saying it, or the Leigh, or the [place name here] jig is the absolute best dovetail jig. I have purchased five dovetail jigs over the past 20 years. Peter Collins of Woodcraft kindly provided us with the AKEDA DC-16 free of charge for the purpose of this review. Consequently, I have had the opportunity to use these jigs to produce dovetails for a wide variety of projects. I find that each jig has its strengths and weaknesses.
All of the popular dovetail jigs produce perfect fitting joints. Period. Consequently, base your decision regarding which jig is best or the best jig for you on the features you're looking for and your specific priorities. For instance:
| Your Preferences
| Jig To Consider
|
| You can only afford to buy one jig to perform both through and half-blind dovetails
| AKEDA, Leigh, PC Omnijig
|
| You only want to learn or master one jig to perform both through and half-blind dovetails
| AKEDA, Leigh, PC Omnijig
|
| You want a jig that is always ready to go, that does not require any setup or adjustments once initially setup | Keller, PC Omnijig
|
| Dust collection is important to you
| AKEDA
|
| You want a jig that allows you to fine tune the fit
| Leigh, PC Omnijig, Keller
|
| You want a jig that has unlimited capacity
| Keller
|
| You have an adversion to guide bushings
| Keller
|
| You want to do easily produce asymmetrical dovetails
| AKEDA, Leigh
|
| You want to rout dovetails on odd-shaped workpieces
| Keller
|
Here is a run down of the dovetail jigs for which I have the most experience:
Leigh D4
I purchased our Leigh 1258R many years ago as my first dovetail jig, and frankly it provides just about everything you could want from a dovetail jig. The Leigh D4 (or 1258R With the D4 upgrades) does it all and does it well. I recently disassembled and reassembled the Leigh and have been using it side-by-side with the AKEDA. It remains at least tied for the most versatile jig out there, all things considered (variety of dovetails and layouts, dovetail geometry, and so forth). It provides infinite joint fit adjustment capability and only the WoodRat provides a greater range of cutter diameters and angles (half-blind joints only).
On the downside, it lacks dust collection, routing half-blind dovetails require you to make and fit filler blocks, and though it handles assymetrical layouts, doing so requires two left and right setups. I often say I would love to have a dime for all of the unused or only slightly used Leigh dovetail jigs sitting under workbenches collecting dust.
But with all that said, if you want the absolutely most flexible, do-it-all dovetail jig, and you are willing to put up with the setups and test cuts, and will either use the jig frequently or don't mind reading the user's guide, the Leigh is hard to beat. Check out our Leigh 1258R/D4 review.
AKEDA DC-16
The AKEDA benefits from being a newer generation tool, designed by someone who has designed dovetail jigs and other woodworking jigs for professional shops for a long time. The AKEDA provides the versatility of the Leigh with the ease of use of a fixed jig like the Keller and PC Omnijig. It is simply a joy to use. Its ergonomics such as the one-handed clamp and its dust collection capability are second to none. Its ease of initial setup is second to none. Its overall ease of use is right there with the Keller and PC Omnijig. It may be the best all around performer and the best choice for woodworkers who don't want to mess around with a dovetail jig, don't use the jig every day, don't like reading through user's guides, yet want to produce a variety of flawless joints. One feature of the jig I especially appreciate is how quickly you can produce a drawer using a combination of half-blind dovetail joints (joining the sides to the front) and through dovetail joints (joining the sides to the rear). The jig allows you to share the tail layout for both sets of tail joints, the only difference being the clamp bar position. The two sets of pins use their particular guide fingers, but share the same layout pencil marks. During video taping, I produced a drawer using half-blind and through dovetails in less than 15 minutes, including setup!
On the downside, the AKEDA does not provide infinite adjustment of fit and joint layout (fingers move laterally in 1/8" increments). In regards to fit, you adjust fit by using one of three straight cutters. I have found this to be acceptable, and it is the price you pay for having the Leigh functionality with the Keller ease of use. Check out our AKEDA DC-16 review.
Keller 1601
The Keller is the most basic and easy to use through dovetail jig we own. If you want absolute simplicity, this is perhaps the jig for you. It produces a perfectly tight fit without testing, every time. It has unlimited width capacity and is an absolute pleasure to use. I love its bearing guided router bits (versus the guide bushings of the Leigh, AKEDA, and Omnijig). I like the fact that the debris exits away from the operator. The Keller can be used with a hand-held router, or you can flip the Keller upside down and use it on a router table (similar to the Katie). You might consider adding Keller's Pro-Clamp kit, as it greatly speeds up and simplifies using the Keller (although my experience with the Pro-Clamp kit is that it is less than perfect). Oh, and the Keller is one of the most commonly used dovetail jigs in commercial shops.
On the downside, using the Keller to produce variable-spaced dovetails is time-consuming and it does not do half-blind dovetails. However, if you're planning on producing drawers with applied fronts, the through dovetail joint produced by the Keller will appear as a half-blind joint once the false front is applied. Check out our Keller 1601 review.
PC Omnijig 5116/7116
The PC Omnijig is built like a tank. The ground cast iron surfaces of the base are impressive. The initial setup of the jig is very easy (get the video). Using the jig could not be simplier. Since you cut two work pieces at a time (front/side or back/side), time spent dovetailing is cut in half compared to the Leigh and similar jigs. Also, since you cut the two adjoining work pieces at the same time, proper fit is assured and chipout is minimized. As a dedicated half-blind dovetail jig, it has no peer, short of buying a Dodds Dovetailer machine. For additional cost, you can purchase templates to cut "traditional" through dovetails, box joints, and so forth. I have not purchased nor used these templates, and have not figured them into the equation of this treatment of dovetail Jigs.
On the downside, the PC Omnijig, at least in its standard configuration, does not produce variable-spaced or asymmetrical half-blind dovetails. Consequently, you size the drawer (7/8" increments) to the jig, not visa-versa. Furthermore, the included and specified 1/2" 14° cutter produces a shallow, bland-looking, dovetail joint. The joint is reasonably strong, and it is similar to the joints you see in "mass-produced" kitchen drawers, but it is not as aesthetically pleasing as the joints produced using the Leigh, AKEDA, or WoodRat. This is not to say you don't have options. I have discovered (and contrary to popular belief and statements on other web sites/magazine articles) that you can use different cutters to produce a much more pleasing-looking joint. Click Here to read my article regarding cutter options. And while you're at it, check out our PC 4112 review. (A review of our 7116 Omnijig is in the works.)
My Choice?
If I was required to choose only one jig from this lot, and fortunately I do not have to do so, I would choose between the Leigh and the AKEDA because they cut the two most important types of dovetails: through and half-blind. Choosing between the Leigh and the AKEDA would be very difficult. The only reservation I have with the AKEDA is its 16" width capacity. This does not mean you cannot produce projects of widths greater than 16", but the jig will only accomodate widths less than 16". For 95% of what we do, this is not a problem. The overall ease of use of the AKEDA, across the broad variety of dovetails it produces, is amazing. The "ergonomics" of the jig including the one-handed clamping, snap-in guide fingers, and dust collection are icing on the cake. The Leigh's advantage is its capability to fine tune the fit and provides slightly more flexibility in layout since its fingers are not indexed. Fortunately, at least for the moment, I can keep my cake and eat it to! Lately I have been asked which jigs I actually use the most. In order, most to least: I use the AKEDA and Keller almost equally, followed by the Omnijig and the Leigh.
The following table is my quick attempt at rating the features of the jigs. Rating these jigs is a difficult task. For one the PC Omnijig offers significant additional capability through the purchase of optional templates, and the Keller will do just about anything you can imagine with through dovetails, at the price of additional manual effort. Again, all of these jigs perform their stated tasks perfectly well. Click on the ratings highlighted in blue to access additional information regarding the rating.
Don't discount making through dovetail joints by hand or the hybrid method employing both the bandsaw and hand. If you're not doing a ton of through dovetail joints, doing them by hand makes sense. If you're a novice at making through dovetail joints by hand, buy or rent the Dovetail a Drawer video by Frank Klausz. Actually, this video teaches more than just dovetails. I found his general woodworking techniques to be very enlightening.
Here is a run down of dovetail jigs you might consider:
Was this article helpful? Do you have any questions? E-Mail Us! We would love to hear from you!
 If I have a woodworking addiction, it is producing dovetails. Not sure why, but I have always been fascinated with dovetails. I hand-cut dovetails using the Frank Klausz method, band saw dovetails using a variation of the Mark Duginske method, and have purchased numerous dovetail jigs including our Leigh 1258R (since upgraded to function as a D4), a Woodstock International (given to my Father), a PC4112 (sold to a woodworking colleague), a Keller 1601 (gets lots of use), and a Porter Cable 7116 Omnijig (basically a PC4112 on steroids). Since purchasing the Keller and Porter Cable 4112/7116 dovetail jigs, we use the Leigh a lot less than in the past. If I need variable-spaced dovetails, it gets the nod. Otherwise the fixed template Keller and Porter Cable 7116 Omnijig get the call, since they're simplier to use and require no test cuts.